My LEGO Scenes
Detail Home

CLICK images for details | browser browser back button to return

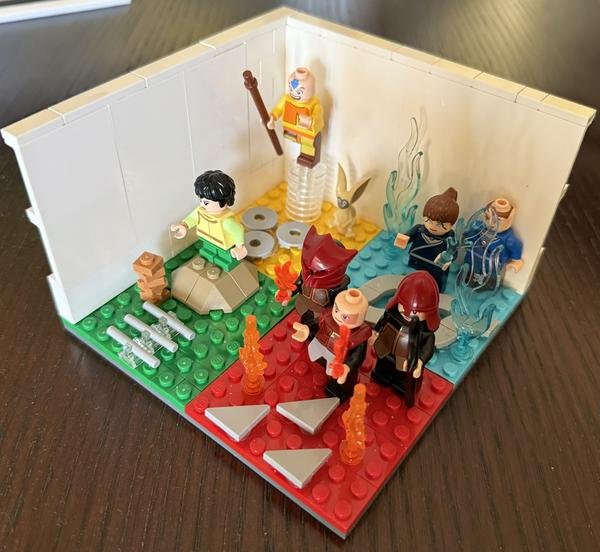
Airbender Habitat

My Review
A 🟢 High concept display of element benders
Designer
sbondi
Release Year
2026
Display
On wire shelf (on top of large cube column)
Figures
  • Aang [in his element quadrant, suspended in a wind twirl holding staff]
  • Katara [in her element quadrant, bending water]
  • Sokka [in his tribe’s element quadrant, behind his sister]
  • Toph [in her element quadrant, on rock bending earth]
  • Prince Zuko [in his element quadrant, bending fire]
  • Momo [in his element quadrant, sitting suspended in air]
Design
  • Wanted to bring out these characters despite no special head/face molding, because they are some of my favorite characters in the world of Sci-Fi/Fantasy.
  • So different than all the other habitats which have scenes, decided to create my first high concept display, since I could not envision a cool scene in the small-space habitat format for these characters.
  • Instead, visualized a quadrant with the four elements loosely mirroring what I have seen in various marketing materials.
  • Wanted to represent the symbol of each element in their quadrant, so I simplified the element symbols to their core three strokes, and used the typical background color associated with each.
  • Since LEGO did not create a minifig for Toph, I crudely created her with light green arms, green pants, short legs, and messy short hair.
Remarks
My MOC

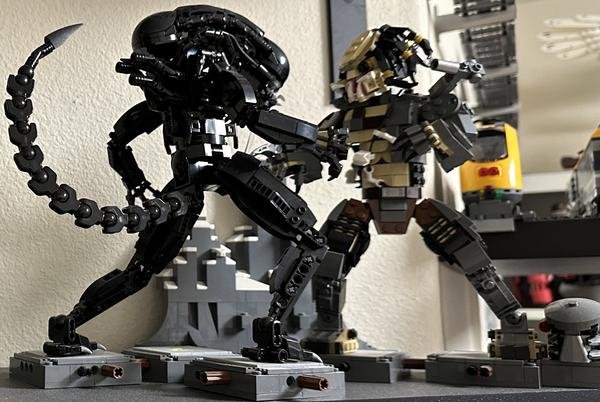
Alien Xenomorph (Fan MOC)

My Review
A 🟢 Impressive organic-looking and source-accurate model
Designer
buildbetterbricks
Product ID
MOC-27578
Release Year
2019
Pieces
599
Instructions
Rebrickable.com
Remarks
Part of Alien vs. Predator scene

Alien vs. Predator

Display
On floating shelf
Sets/Figures
  • Alien Xenomorph (Fan MOC)
  • Predator (Fan MOC)
Mods
  • Built out the Predator mask (designed to be alternatively swapped with the face) to be a standalone helmet in the scene
  • Created two additional base squares (like the ones from the Alien Xenomorph MOC) for the Predator to stand on - with an extension on one base to hold the helmet
  • Created snow-covered mountains for far-away background

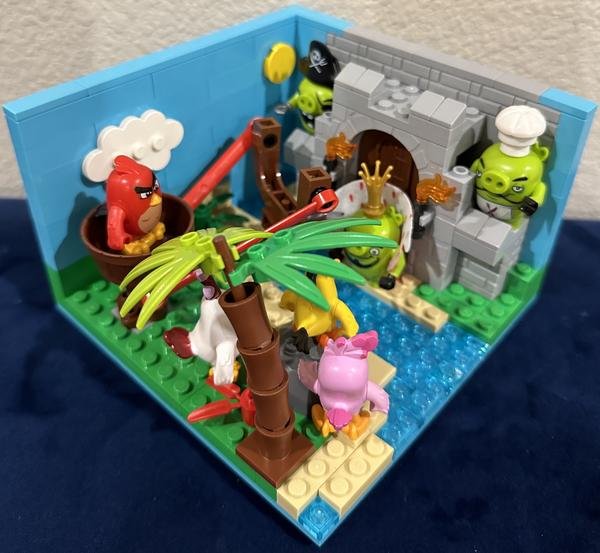
Angry Birds Habitat

My Review
A 🟢 Compact nice-looking way to display iconic characters
Designer
sbondi
Release Year
2022
Display
On wire shelf (on top of large cube column)
Sets
  • King Pig's Castle (75826-1) (basis for catapult)
Figures
  • Bird Island
    • Red [in catapult bucket]
    • Chuck [on rock]
    • Stella
    • Matilda
  • Pig Island
    • King Pig [in front of castle]
    • Chef Pig [on a castle tower]
    • Pirate Pig [on a castle tower]
Design
  • While Red’s catapult is somewhat based on the official set, creatively came up with the small-space scene of the two islands with my own designs of each (including the Pig Castle).
  • Wanted to illustrate a part of the coast of both islands with water in between them (although very little).
    • A beach line, grassy land, a palm tree, colorful plants, a rock, and a catapult (with Red in it) are on Bird Island.
    • A beach line, limited grassy land, and a castle entrance are on Pig Island.
  • Instead of matching the castle to the cartoony one in the game/movie, wanted it to distinctly look like a castle (which it does).
  • Simplified the catapult from the official set to fit in less space and to be secured to the ground.
Remarks
My MOC

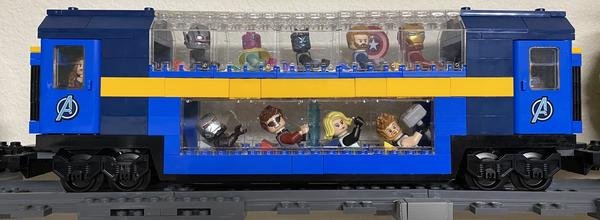
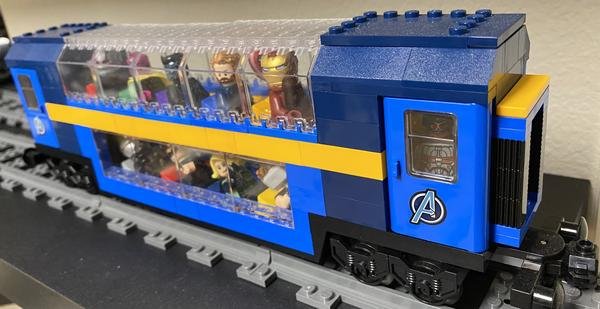
Avengers - Club Car

My Review
B+ 🟢 Looks sleek with Avengers colors and modern design
Designer
sbondi
Release Year
2020
Display
On train tracks connected to Theme Train (stored on floating shelf in Train Yard)
Sets
  • Railroad Club Car (10002-1) (design inspiration)
Figures
  • Inside
    • Front Area
      • Falcon [standing/looking out display-side door window]
    • Top Level
      • Iron Man [red/gold chair]
      • Captain America [red/white/blue chair]
      • Black Panther [purple/black chair]
      • Vision [green/yellow chair]
      • Ant-Man [red/black chair]
    • Bottom Level
      • Thor [yellow recliner]
      • Black Widow [black/blue recliner]
      • Hawkeye [red/black recliner]
      • War Machine [dark grey/light grey recliner]
    • Rear Area
      • Scarlett Witch [standing/looking out display-side door window]
      • Wasp [standing/looking towards inside train]
Design
  • Modernized original set design using Avengers colors, sloped roof, full-length transparent passenger roof, and large panel windows - all to enhance high-up train track visibility.
  • Converted original bottom-deck sleeping berths into a second display deck of seated figures, so both levels show off characters rather than just the top.
  • Scrapped original 2-seat per row design due to being cramped, and thus skewed single seats to “display” side for better visibility:
    • Side benefit: allows more light through from top.
    • Removed Thor’s right leg to fit in limited space.
Remarks
My MOC

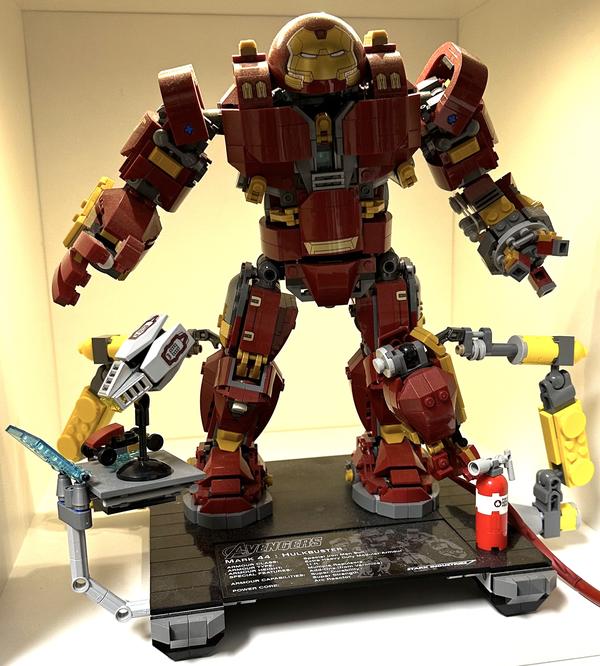
Avengers - Hulkbuster

Display
Small diorama cube
Sets/Figures
  • The Hulkbuster ~ Ultron Edition

Avengers - Quinjet (Compact) (My MOC)

My Review
A+ 🟢 Remarkably close to original design at 50% scale
Designer
sbondi
Release Year
2021
Sets
  • Avengers Ultimate Quinjet (76126-1) (basis of miniature design)
Design
  • When decided to house a parked Quinjet on the upper deck of my Avengers Tower MOC, realized the smaller scale of the model would not accommodate most of the cool Quinjet versions released by LEGO (especially the 2015 version and the 2019 Ultimate version).
  • On Rebrickable, saw an excellent version of the compact Quinjet from the 'Hulk's Helicarrier Breakout' set, so bought the parts of the second iteration version (“Quinjet++”) and built it.
  • Even though it helped me decide it was the smallest size I would be willing to go down to, upper deck was still not long enough to comfortably fit it parked facing forward.
  • Tested adding 16 more studs, but that looked outrageously out of proportion.
  • The model also did not look enough like the Ultimate Quinjet (the most accurate representation of the MCU Quinjets), so I decided to design and build my own MOC, matching the “Ultimate Quinjet” design while staying within the dimensions of the “Quinjet++” - thus, 50% scale of the “Ultimate Quinjet”.
  • Once mocked up that design (Note: I was able to do so with all my own spare parts - just not in the right color - which I later ordered from BrickLink), realized that I could support it with just 8 more studs which was actually a bit closer to the movie proportions relative to the Command Center.
Remarks
Part of Avengers - Tower scene

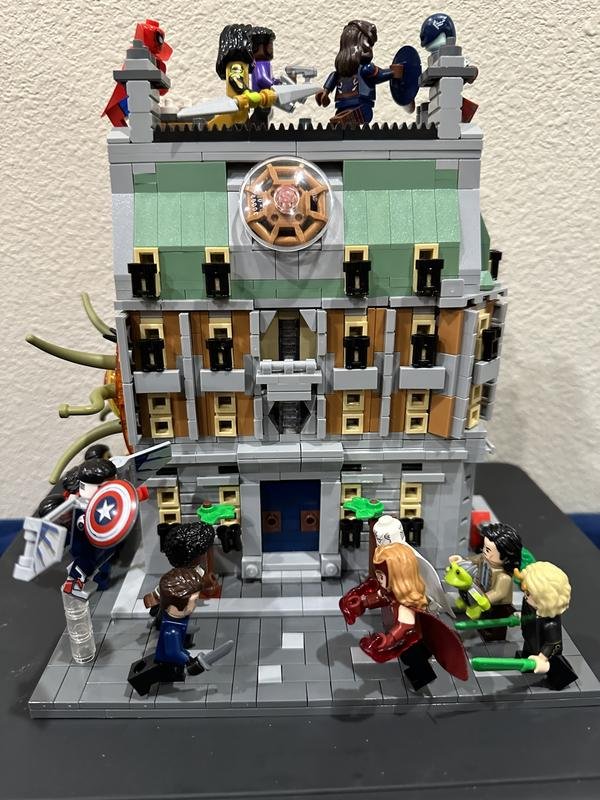
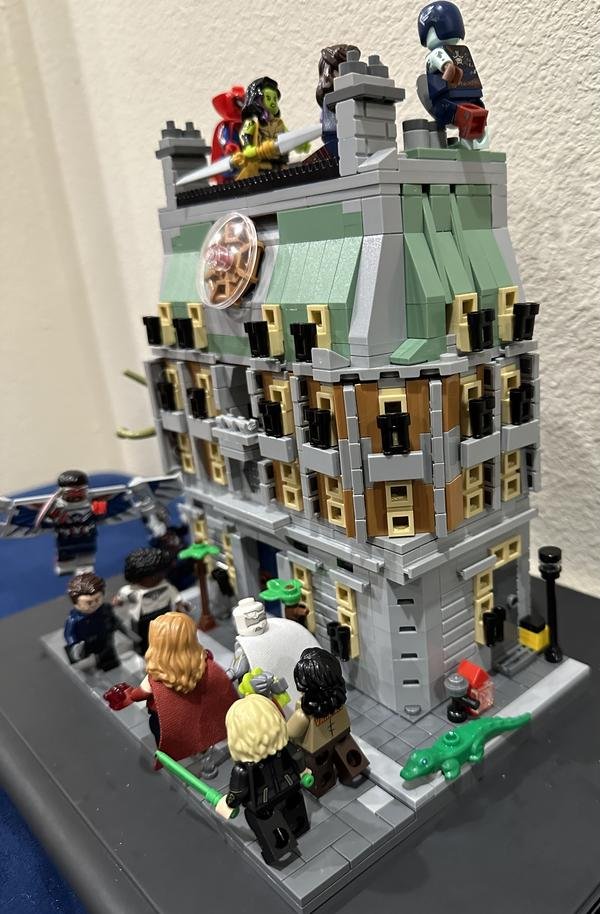
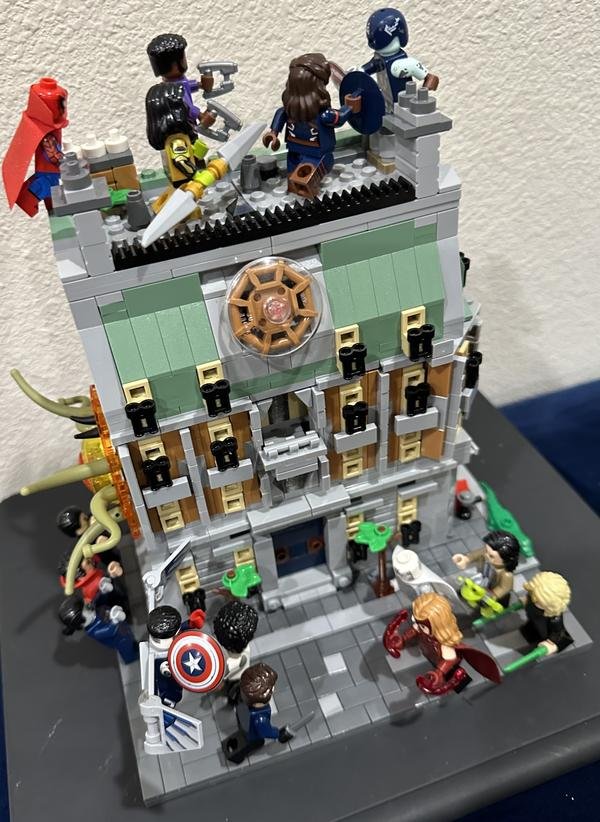
Avengers - Sanctum Santorum

My Review
A+ 🟢 Despite scale issues, beautiful way to display related characters
Designer
ABrickDreamer
Re-MOC Designer
sbondi
Release Year
2022
Display
On floating shelf
Figures
  • Note: All characters from the Disney+ shows
  • On street (characters from 'WandaVision', 'Loki', and 'The Falcon and the Winter Soldier')
    • Falcon [flying above the rest]
    • Winter Soldier [holding knives]
    • Monica Rambo
    • -vs-
    • Scarlett Witch [floating with magic bolts in hand]
    • 'White' Vision [floating]
    • Loki [holding TVA cup in one hand and Throg in the other]
    • Silvie [holding green blades with Alligator Thor next to her]
  • On rooftop (characters from 'What If...?')
    • Captain Carter [with British shield]
    • T’Challa Star-Lord [holding special laser guns with helmet/hair next to him]
    • Zombie Hunter Spidey
    • [holding doubled-edged blade]
    • -vs-
    • Zombie Captain America [holding dilapidated shield]
  • In the alley (from the movie, but appeared in ''What If...?')
    • Dr. Strange
    • Sinister Strange
    • Dead Strange
    • -vs-
    • Gargantos (coming through a portal in the wall)
History
  • When received the 12 super cool Marvel Disney+ minifigs, placed them on 2 of my minifig display stages.
  • However, after showcasing my Muppets Show minifigs in a cool Muppets Show theater MOC, wondered how I could better showcase the Marvel Disney+ minifigs.
  • When saw the recently released (2022) Sanctum Santorum set from LEGO, thought how appropriate that building would be to display the minifigs.
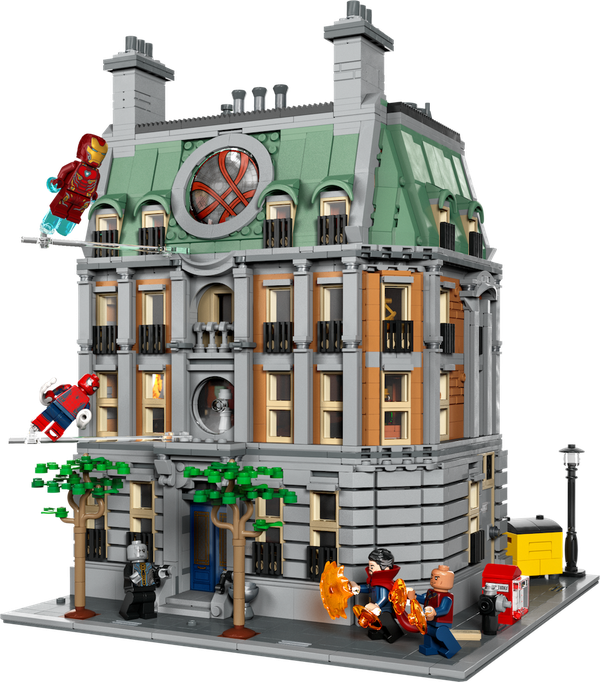
  • However, it was way too big for a minifig showcase display, so I checked Rebrickable.com to see if any MOCs had been made at a smaller scale. Nothing fit the bill - all either minifig scale or much smaller 😞
  • But I got lucky when I searched YouTube, since I found a fan - ABrickDreamer - who was good at creating mini MOCs of sets, and he had created a very nice looking MOC that was just the right dimensions that I was hoping for! 🙂
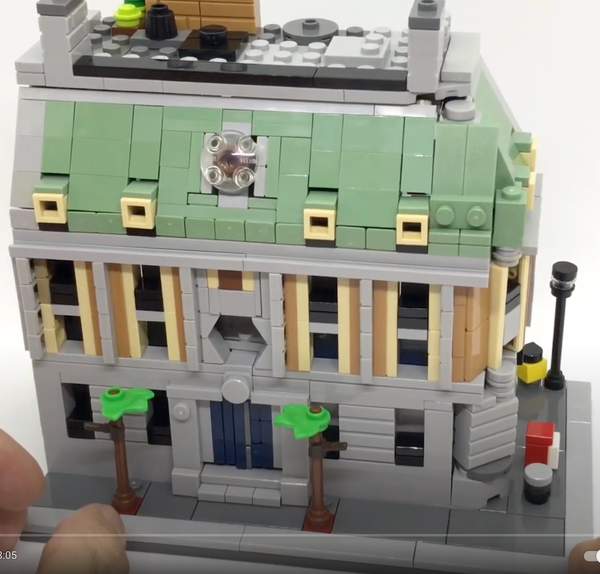
  • He did it only using his own parts inventory, so in the video, he noted some things he would have changed had he had the parts (making the bottom and middle sections each 5 plates higher, using headlight bricks for all the windows, etc.).
  • However, unlike many Rebrickable MOCs, he did not offer a BrickLink Studio model or even instructions - just the tutorial video.
  • So, it was a major chore pausing the video, and trying to figure out what piece went where, while I built up the BrickLink Studio model.
  • First, consider notes regarding LEGO scales:
    • Most LEGO sets each use a bunch of different size scales due to LEGO limitations with modeling reality at a much smaller scale:
      • The relatively large size of the connecting 'stud'
      • The square-block / grid design inherent with LEGO
      • Limited selection of very small pieces to add detail to a scene
      • Minifigs do not match human proportions
    • This is far less true for collector sets that are much bigger, allowing more detail at this bigger scale.
    • In general, a LEGO set designed for minifigs is considered 'minifig scale' (very loosely considered 1:42 scale, although based on minifig width is more like 1:25 scale)..
    • There are also 'micro scale' sets (a variety of scales too small for minifigs) and 'bigger-than-minifig scale' (for 'mini-land' and many other convenience purposes).
    • People are familiar with one of the more common 'micro scales' used for the Harry Potter Hogwarts Castle set, the S.H.I.E.L.D. Helicarrier set, and others which are very loosely based on the size of a micro-figure (very loosely considered 1:80). From these sets, one can gauge what unexpected LEGO parts can be used for trees, doors, windows, cars, etc.
  • Having considered the scale challenges with LEGO, this mini MOC is all over the place with scales.
    • First of all, I consider it about '50%' the size of the official LEGO set. However, this does not apply equally in all directions (e.g., the height is somewhat closer to the original than the width).
    • Also, I am using it to display minifigs - which are a bit bigger in scale!
    • While the original MOC designer has gotten good at the 'miniaturization' of official sets, I noticed that he sometimes uses techniques for the common 'micro scale' which is a much smaller scale than this MOC.
  • When I finished the Re-MOC design, I direct messaged the creator on Instagram:
    • Steve: Hey, here is my completed design!
    • ABrickDreamer: Wow, it looks amazing - Very well done 👏🏼 👏🏼👏🏼
    • Steve: I know you were limited by your parts inventory, but I wanted to better accentuate the “roof bubble window”, the window security bars, the division between the two sets of windows in the middle section, the roof slopes, and the front door. 943 pieces would have been $90 if I got them all new on BrickLink, but I had 500 of the apparently cheaper pieces in my parts inventory, which brought it to $75. ... and the balcony.
    • ABrickDreamer: That’s not a bad price - The solution you find for the roof window works well - Anyway when you have the bricks in hand you also experiment other solutions
Design
  • Firstly, while ABrickDreamer's model is awesome and provided me the right scales and the foundation of my model (as well as great ideas regarding SNOT techniques and miniaturization), in the end, changed quite a bit of his model in the process of putting it into BrickLink Studio.
  • Added a street in front for the placement of minifigs.
  • Replaced his 'micro scale' main door with a much nicer door that I completely designed on my own.
  • Took his advice and made the bottom and middle sections taller than he did.
  • Since was not a fan of his main window designs, I initially designed windows based on stacked 1x1 clear plates. However, since I liked his usage of headlight bricks for the roof windows, I took his advice and redid all windows using headlight bricks.
  • Felt that the bars on the window were a major aspect of the model, and I did not like his generic black plates to represent them. I eventually discovered that using the black 'binoculars' part was a great way to represent these.
  • Did not feel that his model properly differentiated the two sub-sections in the middle section, so I made major changes to his innovative SNOT techniques for the windows, walls, and columns.
  • Was not happy with his main balcony, so I completely redesigned it to better reflect the official set.
  • Felt he oversimplified the right side of the building (with windows and a door), so I completely redesigned it to better reflect the official set.
  • Completely redesigned the roof, also making it modular and removable:
    • Other than his 'headlight' window idea, I did not use anything from his model for the roof. This was especially the case because he limited himself to his own parts inventory which could not take advantage of many other parts available for slopes and such.
    • So, my slopes are much cleaner and more like the official model.
    • My roof bubble window (which should be a highlight of the model) is much more like the official model.
    • My top roof details match the official model a bit better, even if my scales are a bit worse.
    • Happier with the miniaturization compromises I had to make.
  • Eliminated the many items that were just sitting on top of something, instead of being solidly connected.
  • Made the monster Gargantos transporting in from the side wall exactly the same as the official model (except only using the smaller tentacles for better scale), even though it kind of awkwardly takes up the full width of the side wall due to being half the scale of the monster. I am ok with the scale difference, since I believe the monster was already undersized for the official model scale. However, the in-scene story is that Gargantos used his magic to shrink the world of the heroes, so he could easily defeat them - but the heroes were not present at the time, so he only shrunk the buildings ;-)
  • Added a small alley on the 'Gargantos' side to place the 3 Dr. Stranges from the movie (which were also in the 'What If ...?' series).
  • Completely closed up the back area.
Remarks
Miniaturized model - My Re-MOC of Fan MOC

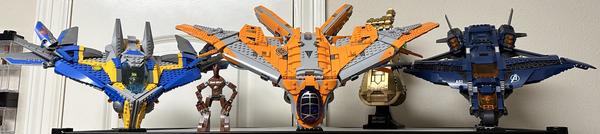
Avengers - Ships

Display
On top of wire shelf which sits on top of 1 large cube column
Sets
  • The Guardians' Ship [a.k.a., The Benatar]
  • The Milano Spaceship Rescue [just The Milano spaceship]
  • Avengers Ultimate Quinjet [just ship and interior accessories]
  • Infinity Gauntlet
Figures
  • The Benatar
    • Peter Quill [pilot]
  • The Milano
    • Rocket Raccoon [from The Guardians' Ship set] [pilot]
  • Quinjet
    • Black Widow [pilot]
Mods
  • (for all ships) Created transparent/black stands to display in near 45 degree downwards positions with front tips touching bases
  • The Benatar
    • Technic stand that came with it did not meet my needs
  • The Milano
    • For safety
      • Removed stud projectile triggers and left projectiles for display (will not shoot)
  • Quinjet
    • For safety
      • Replaced with 'dummy' projectiles (cut-off tips) for display (will not shoot)
      • Left multiple round projectiles for display, since not likely to shoot off

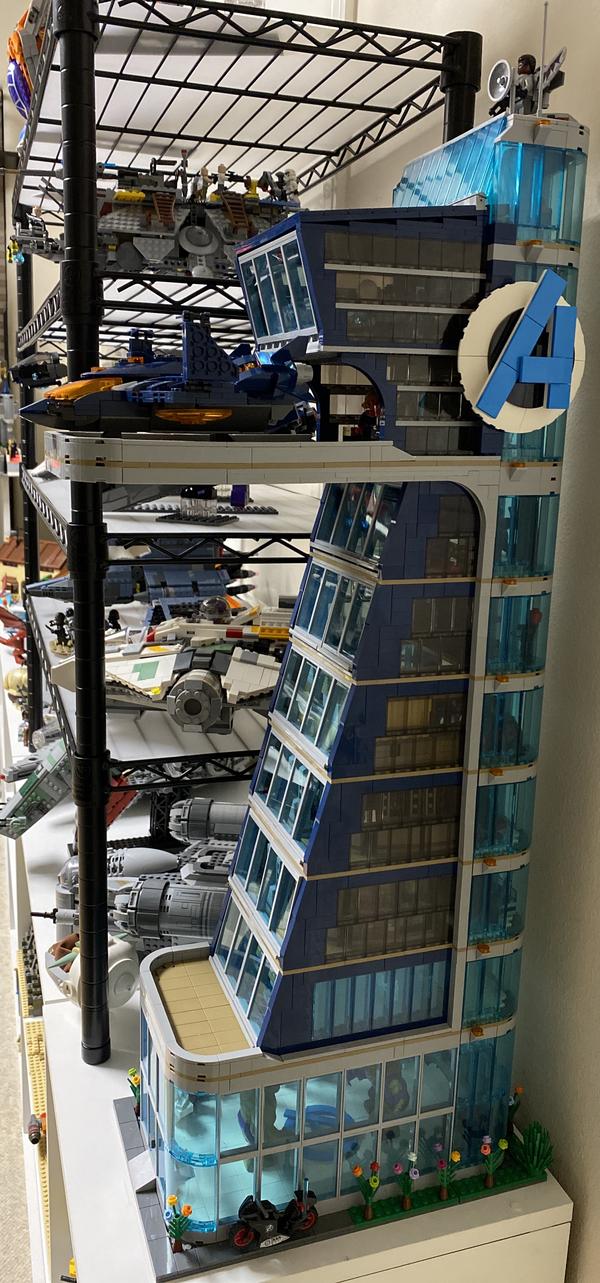
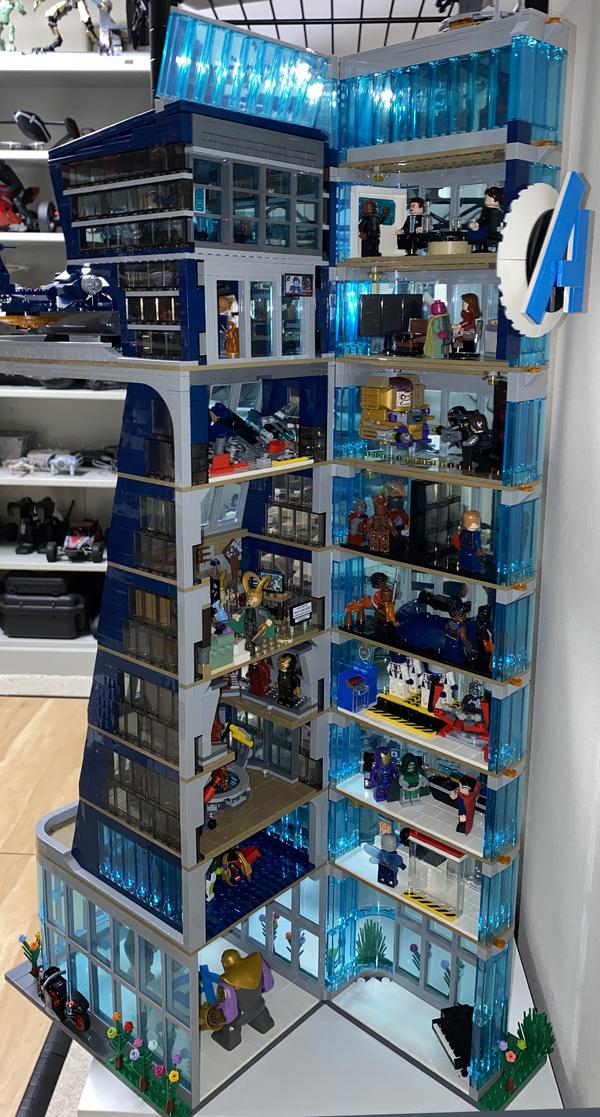
Avengers - Tower

My Review
A+ 🟢 Although it uses the original set's design aesthetics, it is truly a wholly new design that comes a lot closer to the movie version
Designer
sbondi
Release Year
2021
Display
On top of 1 small cube column
Sets
  • Avengers Tower Battle (2020) [2x; kept all scenes and almost all parts, and maintained design]
  • Attack on Avengers Tower (2015) [3x; kept all the scenes and used many of the parts]
  • Bro Thor's New Asgard [except for doorway that would not fit in space]
  • Iron Man Hall of Armor [scaled down to fit space]
  • Avengers Compound Battle [just planning room and some accessories]
  • Avengers - Quinjet (Compact) (My MOC)
    • [my own creation inspired by the design of the Ultimate Quinjet set]
  • Baby Grand Piano (My MOC)
    • [my own simple creation]
  • MODOK (My Re-MOC)
    • [my own creation made from two sets to minimize size in limited space]
Figures
  • See 'Floors/Rooms' below
History
  • Evolved from these two versions:
    • Avengers - Tower - Stage 1 (My Re-MOC)
    • Avengers - Tower - Stage 2 (My Re-MOC)
  • Even though I was happy with my Stage 2 tower, in 2021, after watching Bevin's Bricks (on YouTube) build an awesome 7-foot-tall Avengers tower from scratch -and- noticing that most AFOLs' enhancements to the 2015 set included increasing the width beyond just 2 windows, I thought I should take another stab at enhancing my tower, considering the following:
    • At the current scale relative to LEGO part sizes, it would be difficult to try to lean into a more realistic model like Bevin's Bricks did with his much bigger scale.
    • LEGO designers made some cool-looking 'LEGO design compromises' (representing much bigger scale detail at the smaller LEGO set scale) to come closer to the movie look with the 2020 set than the 2015 set did.
    • I wanted to stick with many of the 2020 set design choices (colors and architecture) while going much bigger and endeavoring to more closely match the movie look attributes.
    • I wanted the width to go from 2 to 4 windows (8 more studs), so I would also have to proportionally expand the depth by about 14 studs to maintain the desired shape.
Design
  • Expanded size from Stage 2 by 2-3 times (mostly in width and depth, and lesser so in height)!
    • Expanded base dimensions 9 floors x 22 studs deep x 12 studs wide -to- 11 floors x 36 studs deep x 20 studs wide.
    • Maintained my modified 2020 LEGO design with colors and windows versus trying to more closely match MCU look; although put some effort into better matching the MCU structure (including making the upper deck large enough to hold a compact Quinjet).
    • Over $500 in additional parts (over $1,000 in overall cost)
  • Added platform (extending out by 2 studs) for more support and allowing for outside landscaping.
  • Re-designed the upper deck and control center on top of it to more closely match the movie look attributes.
  • Re-designed the top section (above and behind the control center) to more closely match the movie look attributes.
  • Re-designed brick-built logo to be 50% bigger. Based on the height of the upper floors it should have been double the size to match the movie dimensions, but since the model is not as deep as the movie version, 50% was the compromise.
  • Re-designed the upper deck to be big enough to hold a compact Quinjet:
    • The weight of the upper deck became so great (with the additional length and holding the Quinjet) that I had to add extra support / connection points to the walls of the room directly below the deck.
  • Created my own compact MOC Quinjet from scratch as a 50% scale 'Ultimate Quinjet' in order to fit on new upper deck:
    • While it is designed to seat 5 Avengers (including the pilot), I did not endeavor to make enough headroom for the pilot when getting the form factor the way I wanted.
    • After many attempts to implement a functional rear cargo door without looking too awkward at this small scale, I gave up, so the cargo door is not functional.
    • Despite the 50% scale, I was able to use the same cockpit windscreen and the same rotors.
  • When LEGO released the awesome Avengers Tower in 2023, I also had to have it. It easily beats mine in the movie accuracy of the colors, silhouette, the deck detail, and all exterior details. However, mine still excels in the following:
    • My creative massive 16 interior builds (versus just 4 for the 2023 Tower) - all with easy direct access by swinging open building; 2023 Tower scenes are accessed by removing front panel, making it hard to see the back of the scenes
    • My accurate mini-Quinjet which can hold 5 minifigs and clearly fits facing forward on my deck, while I did not even build the 2023 one as it as so pathetic - fitting just one minifig, not looking very good, and only awkwardly sitting sideways on the deck
    • My decked out occupied control room (while 2023 Tower has nothing under the outer shell)
Floors/Rooms
  • Floor 1
    • Outside: Building Surroundings
      • Specs: +2 studs on each side of building; Light Bluish Gray tile (representing pavement) and un-tiled Green plates (representing grass)
      • Parked Black Widow motorcycle on side pavement
      • Landscaped with flowers and bushes
    • Front and Rear Section: Lobby (2 stories for vaulted ceiling)
      • Specs: 18x34 curved on two sides; White tile
      • Minifigs: Hulk, Thanos [with Infinity Gauntlet and all stones]
      • Kept reception desk and glass chandelier
      • Added Avengers logo to floor
      • Added my own Baby Grand Piano
  • Floor 2
    • Front and Rear Section: Lobby (2 stories - see above)
      • Specs: 18x34 (open air as vaulted ceiling) curved on two sides
  • Floor 3
    • Front Section: Training Room
      • Specs: 16x19 with slanted windows on one side; Trans-blue tile (representing 'holographic' tech room)
      • Minifigs: Iron Spider and She-Hulk
      • Expanded weapons rack from original set
      • Added 'floating' drone shooting laser beams
    • Rear Section: Infirmary
      • Specs: 18x7 curved on one side; White tile
      • Minifigs: Ant-Man, Wasp, Ghost
      • Kept patient table
      • Added scanning device over table
  • Floor 4
    • Front Section: Iron Man Hall of Armor (Bottom Level of 2 stories)
      • Specs: 16x17 with slanted windows on one side; Dark Tan tile
      • Minifigs: Iron Man MK 42, Iron Man MK 47, Iron Man MK 50, Iron Man MK 85, Dum-E robot assistant
      • Due to size constraints (including height), scaled down the set to its core features, but added 7 more suits on top level
    • Rear Section: Lab
      • Specs: 18x7 curved on one side; White tile
      • Minifigs: Doctor Strange, Rescue, Doctor Doom [in handcuffs]
      • Kept Tesseract Analyzer and Loki Scepter Analyzer from original sets
  • Floor 5
    • Front Section: Iron Man Hall of Armor (Top Level of 2 stories)
      • Specs: 16x15 (just outer rim) with slanted windows on one side; Dark Tan tile
      • Minifigs: Iron Man MK 1, Iron Man MK 2, Iron Man MK 3, Iron Man MK 5, Iron Man MK 6, Mark 17, Iron Man MK 41
    • Rear Section: Robot Room
      • Specs: 18x7 curved on one side; White tile
      • Minifigs: Ultron, 4 Iron Legion robots
      • Kept Ultron scene from original set
      • Kept scaled down pieces of Iron Legion launch deck from previous iterations
      • Added a control cabinet
  • Floor 6
    • Front Section: Bro Thor Pad (2 stories for vaulted ceiling)
      • Specs: 16x13 with slanted windows on one side; untiled (to represent shaggy carpet)
      • Minifigs: Bro Thor, Korg, Meeg, Loki
      • Due to some dimension constraints, just eliminated door
    • Rear Section: Black Panther Resurrection Chamber
      • Specs: 18x7 curved on one side; Black tile
      • Minifigs: Black Panther, Shuri, Nakia, Okoye, Black Jaguar (Killmonger)
  • Floor 7
    • Front Section: Bro Thor Pad (2 stories - see above)
      • Specs: 16x11 (open air as vaulted ceiling) with slanted windows on one side
    • Rear Section: Prison Visitation Room
      • Specs: 18x7 curved on one side; Black tile
      • Minifigs: Star-Lord, Gamora, Drax, Rocket Raccoon, Teen Groot, Ayesha [captive in handcuffs], Captain America (no mask), Red Skull [captive in handcuffs]
  • Floor 8
    • Front Section: Drone / Hoverbike Launch Pad
      • Specs: 16x9 with slanted windows on one side; White tile
      • Minifigs: <none>
      • Kept scenes from original sets
      • Created launch device for drone
    • Rear Section: Counter-A.I.M. Room
      • Specs: 18x7 curved on one side; Dark Tan tile
      • Minifigs: MODOK (MOC), War Machine, Winter Soldier
      • Created MODOK MOC using from two different versions to fit the limited height of the room
  • Floor 9
    • Outside: Uncovered Upper Deck
      • Specs: 20x19 curved on one side; Dark Tan tile
      • Minifigs: <none>
      • Created landing area for my own Quinjet
    • Front Section: Covered Upper Deck
      • Specs: 16x16; Dark Tan tile
      • Minifigs: Tony Stark [with Iron Man MK 43 chest], Captain Marvel, cat
      • Kept portions of deck from original set
      • Added mini-bar
    • Rear Section: Lounge
      • Specs: 18x7 curved on one side; Dark Tan tile
      • Minifigs: Vision, Scarlet Witch
      • Kept lounge from original set
      • Added TV and snack table
  • Floor 10
    • Front Section: Command Center
      • Specs: 16x15; Black tile
      • Minifigs: Black Widow, Quick Silver
      • Kept equipment from original sets
      • Modified “Iron Man Hall of Armor” workstation to be all black
      • Added small holographic table
    • Rear Section: Planning Room
      • Specs: 18x7 curved on one side; Dark Tan tile
      • Minifigs: Nick Fury, Agent Coulson, Maria Hill, Hawkeye
      • Used planning room items from original set
  • Floor 11
    • Front Section: Main Roof
      • Specs: 18x18; Dark Blue tile
      • Angled Trans-light Blue Bars toward rear section
    • Rear Section: Arc Reactor Room
      • Specs: 18x7 curved on one side; un-tiled
      • Used arc reactor from original set
      • Enhanced with turbine-powering design
  • Top
    • Outside: Falcon Perch
      • Used perch from original set
Remarks
My MOC

Avengers - Tower - Stage 1 (My Re-MOC)

My Review
B 🟢 At this stage, it borrows a lot more from the original set, but still adds a bit to make it look like a tower
Re-MOC Designer
sbondi
Release Year
2015
Sets
  • Attack on Avengers Tower (2015) [3x]
Figures
  • All figures from set
  • More Avengers (primarily MCU versions)
  • Red Skull
History
  • In 2015, out of a whim, when one of the first drones I bought had a LEGO-block-type connector to fly LEGO minifigs around, I realized that I never had LEGO themed sets (especially the franchised ones with classic characters in minifig form), so I thought it would be cool to collect my favorite franchise characters in LEGO minifig form.
  • I quickly realized that trying to buy minifigs on Amazon, eBay, and eventually BrickLink was getting costly, and if I were to purchase cool current franchise sets, they would come with a much more reasonable price for multiple franchise character minifigs.
  • Being a major fan of the Marvel Cinematic Universe (MCU), my first set was the 2015 'Attack on Avengers Tower' set.
  • I was impressed with all the minifigs and cool movie scenes, but I was also seriously disappointed with the anemic 3-story 'skyscraper' 😞
  • I lived with it for a few months while I bought many other sets. Most of them I would keep, but a few were more kiddy than I had realized, so I broke them down, and started building up my spare parts reservoir 🙂
  • But relative to the Avengers Tower set, like most Adult Fans of LEGO (AFOLs), I decided to buy multiple sets to at least make it taller. And for me, because the initial 'raw material' was so small and each lower floor would get bigger due to the outward slant, I bought 2 more sets to accomplish what I wanted: adding 3 more stories (2 of them being a 'massive' double-story lobby).
Design
  • Purchased three sets to create a taller tower
  • To the existing three stories (including penthouse), added 3 more stories:
    • 2 “angled” levels (each bigger due to maintaining building angle)
      • Training level
      • Incarceration level
    • 2-story “non-angled” lobby level
    • Tiled white
Remarks
Earlier version of Avengers - Tower scene

Avengers - Tower - Stage 2 (My Re-MOC)

My Review
B+ 🟢 Although it continues to borrow somewhat from the original set, there are significant design changes in the windows and colors
Re-MOC Designer
sbondi
Release Year
2020
Sets
  • Avengers Tower Battle (2020) [2x; kept all scenes and almost all parts, and maintained design]
  • Attack on Avengers Tower (2015) [3x; kept all the scenes and used many of the parts]
Figures
  • All figures from 2020 set
  • More Avengers (primarily MCU versions), including from Guardians and Black Panther!
  • Various Avenger villains
    • Thanos
    • Red Skull
History
  • I was happy with my Stage 1 tower built from the 2015 set, while I noticed on YouTube that more serious AFOLs enhanced this set in a much more expansive way to try to approximate the movie design better.
  • Then, in 2020, the 'Avengers Tower Battle” set came out to the joy of most AFOLs, because it improved so much on the 2015 set, including modernizing the colors, including a brick-built logo, and moving from 3 to 5 stories! 🙂
  • Since I had scenes and parts from the 2015 set (which I broke down) -and- since this set started off with much more 'raw material', I only had to buy a total of 2 sets this time to make what I wanted: adding 4 more stories (2 of them being an even more 'massive' double-story lobby).
  • While it appears many AFOLs on YouTube remained with their beautiful creations from the 2015 set, I was happy to upgrade to a bigger, cooler looking set/creation.
Design
  • Tore down Stage 1 tower
  • Purchased two 'Avengers Tower Battle” sets (2020 version) to create a taller tower
    • This one started with enough floors to allow more mods with only 2 sets
  • Significantly modified the base set design
    • Removed unnecessary arc reactor play feature
    • Redesigned sides to have more dark blue and more consistent windows with each bigger floor
    • Redesigned room openings to be less obtrusive
    • Redesigned “angled” windows to not use clunky-looking hinge design, but to rather be sleeker by just half-sitting in the floor stud pocket while angling up to a plate on the room ceiling
    • Redesigned lowest original floor to not be special like a bottom floor, but to look more like the floor above it
  • To the existing five stories (including penthouse), added 4 more stories (bottom lobby is double-storied):
    • 2 “angled” levels (each bigger due to maintaining building angle)
      • Enough to maintain all specialty rooms from each set in addition to my custom rooms
      • Implemented consistent “lighting' inside and outside
      • Incorporated hidden drone from 2015 tower defenses into a room where it can launch out of
      • Implemented Iron Legion launch room from 2015 set with custom changes to fit smaller space
    • 2-story “non-angled” lobby level
      • Tiled white
      • Implemented a custom reception desk
      • Implemented a majestic glass chandelier (tweaked online design)
      • Implemented matching balcony with roof (from second set) on top of lobby
Remarks
Earlier version of Avengers - Tower scene

Avengers - Tower (2023)

My Review
A+ 🟢 My complete inversion to suit my display seemed impossible (and was grueling with every mini-build), but, it came out looking awesome!
Re-MOC Designer
sbondi
Release Year
2023
Display
On floating shelf
Sets
  • Avengers Tower (2023) [kept building structure and key minifigs]
Figures
  • Tony Stark
  • Captain America
  • Thor
  • Hulk
  • Black Widow
  • Hawkeye
  • Nick Fury
  • Loki
Design
  • Background: Since I already spent years creating my pride-and-joy Avengers Tower MOC, I only bought this for its more movie-accurate silhouette and colors. As such, I display it in the back of the room in the limited area at the end of my floating minifig shelf which had some significant challenges:
    • The shelf is 2.5' shallower than the building's footprint.
    • The shelf is on a slight upper angle to better handle all the weight on it.
  • Reduced footprint: To fit the limited shelf space, I cut the 32x32 baseplate to hold just the building footprint (no front sidewalk, no back alley).
  • Shimmed to make level: To compensate for the shelf’s slight upward angle, I put a LEGO shim under the right side of the baseplate to make it level.
  • Extra Support: Due to this shim, the building now had to support its own weight (about 20 pounds) on an angle, so I added a layer of large dark bluish gray plates on top of the cut baseplate to reinforce the solid structure the building already had.
  • Inverted most of the build: Since the designed hero view had the deck on the right, I would have the core weight of the building 2.5” off the shelf, and the cool blue curved “front” feature would be hidden against the wall - not to mention that this would go against how I always visualized the deck on the left.
    • So, even though one of Claude AI’s smartest levels reviewed the instruction booklets, my given constraints, and online commentary of the set, and said inverting it would not be practical, I painstakingly went through the analysis of each mini-build, and made my case (that Claude eventually agreed with) that it can be done with not as much complexity as originally thought, and that I would have to go through the still-painful process.
    • As I built each floor, I placed the parts at their inverse position, always keeping focused on the hero face/back/front/rear from the design to my inversion.
    • It was a grueling process that added many hours and stress to this build, but at least I can say that a part of me is in this build!
  • Undid all the damage: Kept my view clean, by undoing the damage scenes.
Remarks
My Re-MOC

Baby Grand Piano (My MOC)

My Review
B+ 🟢 Perhaps only one of its kind truly at the minifig scale
Designer
sbondi
Release Year
2021
Design
  • Wanted to class up the lobby of the Avengers Tower, so I built a chandelier, and then felt like I needed a piano.
  • But LEGO had never provided a minifig-scale piano that I could use.
  • And was unable to find any Fan MOCs that were properly minifig-scale.
  • So carefully researched the scale of a Baby Grand Piano to a human, and translated it to minifig scale.
  • Was able to find a cool piano keys design that was designed for a bigger piano, and did my best to tweak it to my minifig scale (of course with far less keys than a real piano).
  • In the end, took hours of trying many special part combinations to get the shape of the piano to my liking (comparing to real piano reference photos).
Remarks
Part of Avengers - Tower scene

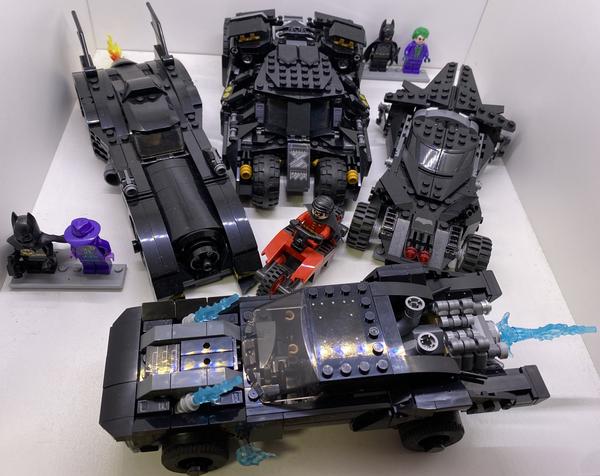
Batman - Batmobiles

Display
Small diorama cube
Sets
  • Batmobile: The Penguin Chase
  • Kryptonite Interception [just Batmobile from “Batman v Superman” movie]
  • 1989 Batmobile (Limited Edition) [smaller gift version]
  • Batmobile Tumbler: Scarecrow Showdown
Figures
  • Batmobile: The Penguin Chase
    • Batman [from “The Batman' movie]
    • The Penguin [from “The Batman' movie] [in handcuffs]
  • Kryptonite Interception and Sky High Battle
    • Batman [from “Batman v Superman” movie]
  • 1989 Batmobile (Limited Edition)
    • Batman [from 'Batman' movie]
    • (outside vehicle from large 2019 set)
      • Batman [Michael Keaton] [w/ hard cape]
      • Joker [Jack Nicholson]
  • Batmobile Tumbler: Scarecrow Showdown
    • Batman [with 'fear toxin' head/face, from 'Batman Begins' movie]
    • (outside vehicle from large 2014 set)
      • Batman [Christian Bale]
      • Joker [Heath Ledger]
Mods
  • “Sky High Battle” Batwing
    • Created transparent/gray stand to display in near 45 degree downwards position, while accommodating corresponding Batmobile underneath
    • For safety
      • Left multiple round projectiles for display, since not likely to shoot off
  • 'Kryptonite Interception” Batmobile
    • For safety
      • Removed stud projectile triggers and left projectiles for display (will not shoot)
  • Batmobile Tumbler: Scarecrow Showdown
    • For safety
      • Removed stud projectile triggers and left projectiles for display (will not shoot)

Batman - Batmobiles (Big)

Display
On floating shelves
Sets
  • 1989 Batmobile [from 'Tim Burton’s Batman' movie]
  • The Tumbler [from “The Dark Knight Trilogy” movies]

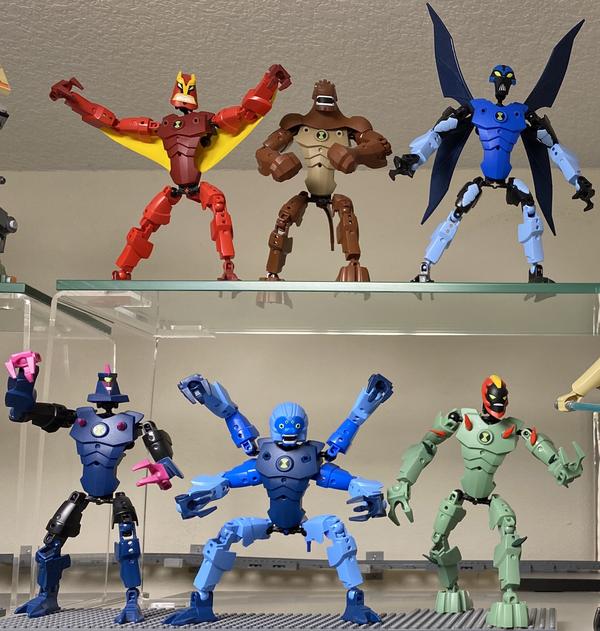
Ben 10

Display
On top of shelving unit with acrylic shelf in back for second row of figures
Sets
  • Top Level
    • Jet Ray
    • Humungousour
    • Big Chill
  • Bottom Level (on base platforms)
    • Chromastone
    • Spidermonkey
    • Swampfire

Cars

Display
Large diorama cube
Sets
  • Flo’s Diner
    • Flo's V8 Café
    • Mack's Team Truck
  • Tokyo Speedway
    • Tokyo International Circuit
    • Tokyo Pitstop [just Lightning’s pagoda]
Figures
  • Flo’s Diner
    • All figures from sets
    • Sheriff
  • Tokyo Speedway
    • All figures from sets
Mods
  • Put Light Bluish Gray Baseplates for the floor across both areas
  • Created divider to separate Tokyo Speedway from Flo’s Diner
  • Tokyo Speedway
    • Tiled pit areas with Light Bluish Gray tiles and white dotted divider line
  • Flo’s Diner
    • Created ramp to allow Mack (truck) to be partially visible from behind Flo’s Diner

Disney - Castle

Display
On top of small cube column
Sets
  • Disney Castle (2023)
  • Disney - Castle Platform (My MOC)
Mods
  • Removed trees on one side, greenery from the other side, and most of water feature on the front, so footprint mostly fit in my limited space with castle platform (darker studded water)
    • Involved reworking/replacing some of the bottom infrastructure with my own pieces to stop build near castle borders, while maintaining structural integrity
    • Decided to keep narrow light blue base around bridge, but covered with darker blue clear pieces
    • Adjusted back platform wall to connect to two-stud wider bridge
Remarks
When first placing, lost two gold pieces (1x1 cone and claw cylinder), but had a cone replacement, and left cylinder off since was in the back.

Disney - Castle Platform (My MOC)

My Review
A+ 🟢 Completes the castle with an authentic design, and a great way to display the many cool Disney characters
Designer
sbondi
Release Year
2021
Figures
  • Classic characters
    • Mickey Mouse [from castle set on entrance/drawbridge]
    • Minnie Mouse [from castle set on entrance/drawbridge]
    • Donald Duck [from castle set on entrance/drawbridge]
    • Daisy Duck [from castle set on entrance/drawbridge]
    • Goofy [on entrance/drawbridge]
    • Pluto [on stage]
    • Chip [on stage]
    • Dale [on stage]
  • From Alice in Wonderland
    • Alice [on walkway]
    • Queen of Hearts [with heart scepter on walkway]
    • Cheshire Cat [on stage]
  • From Cinderella
    • Gus [on stage]
  • From Peter Pan
    • Peter Pan [flying off one of top towers]
    • Tinkerbell [from castle set flying off one of top towers]
    • Captain Hook [with sword on walkway]
  • From One Hundred and One Dalmatians
    • Cruella de Vil [with baby Dalmatian on walkway]
  • From Beauty and the Beast
    • Cogsworth [on stage]
    • Mrs. Potts [on stage]
    • Chip Potts [on stage]
    • Babette [on stage]
    • Lumière [on stage]
  • From The Little Mermaid
    • Ariel [in moat]
    • Ursula [with trident on walkway]
    • Sebastian [on stage]
    • Flounder [on stage]
  • From Aladdin
    • Aladdin [with lamp on walkway]
    • Genie [with lamp on stage]
    • Jasmine [on walkway]
    • Jafar [with scepter on walkway]
  • From Lilo & Stitch
    • Stitch [on stage]
  • From Tangled
    • Pascal [on stage]
  • From Frozen
    • Elsa [with ice bolt on walkway]
    • Anna [on walkway]
    • Olaf [on Sven's back on stage]
    • Sven [on stage]
  • From Moana
    • Pua [on stage]
  • From Maleficent
    • Maleficent [with scepter on walkway]
Design
  • Based on photos of different era Disney Castles at Walt Disney World, used the features that worked best for the pre-2021 (mostly circa 2015) LEGO Disney Castle.
  • Looked at the whole infrastructure of the castle complex:
    • castle/drawbridge (with many towers)
    • stage/walkway
    • audience area (with two towers)
    • castle complex entrance (with two towers)
  • Could not accommodate all 4 sections in the allotted space, so aside from the LEGO Disney Castle covering the first area (except for water below/around the castle/drawbridge), decided to build the water below/around the castle/drawbridge and provide for just the 'second section' with the stage/walkway.
  • Due to the mini-fig scale (and corresponding size of LEGO pieces) and limitations of the space (it is already protruding 9 studs beyond cubicle top!), made the following notable compromises:
    • The arc of the walkway around the stage had to be done more 'shoulders-like' (versus 'rounder') to leave enough space for the stage to be a reasonable depth.
      • Also because of this, the distance between the walkway and the stage (at the front of the stage) is far narrower than it should be.
    • There should be two more arches on the stage, and all arches should be much more ornate and detailed.
    • The two photo-taking areas on the walkway were placed on the corners for convenience, but are not in those spots in real life.
Remarks
Part of Disney - Castle scene

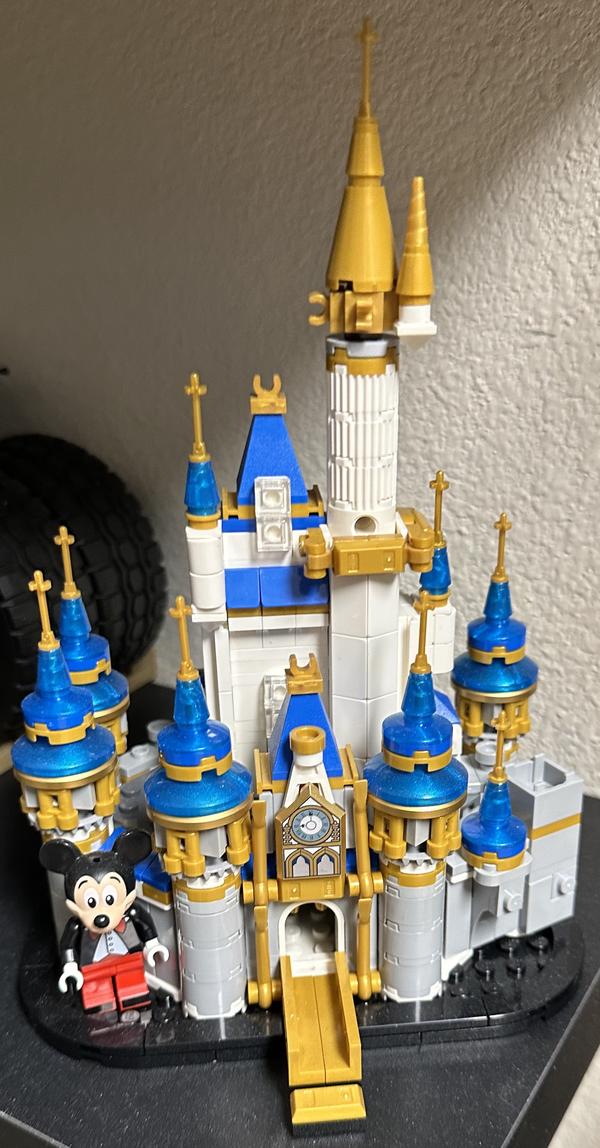
Disney - Mini Castle

Display
On floating shelf
Sets
  • Mini Disney Castle
Figures
  • Mickey Mouse (from set)

Disney - Train

My Review
B 🟢 Builds on the original awesome design to be more open
Re-MOC Designer
sbondi
Release Year
2020
Display
On train tracks (stored on floating shelf in Train Yard)
Sets
  • Disney Train and Station (just train)
Figures
  • Engine Car
    • Mickey Mouse (Blue Overalls)
  • Passenger Viewing Car (“Disney - Classic”)
    • Left Section
      • Front Row
        • Donald Duck [removed tail feathers]
        • Goofy
      • Back Row
        • Huey Duck
        • Scrooge McDuck [removed tail feathers which have some blue]
        • Louie Duck
    • Middle Section
      • Alice
    • Right Section
      • Front Row
        • Minnie Mouse [removed pink polka-dot skirt]
        • Daisy Duck [removed tail feathers]
      • Back Row
        • Cheshire Cat
        • Dewey Duck
  • Passenger Dining Car (“FOX - The Simpsons”)
    • Inside
      • Bart (Looking Left) [with slingshot]
      • Lisa (Bright Pink Dress) [with saxophone]
      • Homer (Tie and Jacket) [removed candy box]
      • Marge (Orange Dress) [removed flowers and purse]
      • Maggie (“Worried Look”) [with teddy bear]
    • Outside (front balcony)
      • Ned Flanders
    • Outside (back balcony)
      • Grandpa
Design
  • Engine Car
    • Added fixed platform to cabin, so conductor does not move with rear wheel base
    • Added compass indicator in cabin, since there were no other indicators or controls
    • Transposed black piping near cabin to other side so can be viewed with train direction design
  • Tender Car
    • Motorized with Powered Up motor/battery after re-designing to be as full length car with two train motors (i.e., two sets of motorized wheels) for the power needed to pull 6 cars and to push the Engine car
    • Added LEGO “weight' part in front to give traction to front set of motorized wheels
    • In order to keep the front set of motorized wheels in the same direction, cut a hole in train base plate to allow motor cable front access
  • Passenger Viewing Car
    • To allow comfortable seating
      • Removed back seats
      • Placed one seat in middle of Left Section
      • Left Front Row middle seats empty
    • To allow more light
      • Added hinge to middle section
      • Connected all three roof sections
      • Removed back poles
      • Extended front poles with short white poles on top
    • Added label
      • Removed steps
      • Trimmed front ornamental display to make space for large sign
      • Connected sign to left and right section pieces
    • Added weights in back section to minimize shaking
  • Passenger Dining Car
    • To add more light
      • Tore down roof and front wall (removable and fixed portions)
      • Turned into semi-formal sun room (open ceiling, plants/flowers on rafters, open front with gates)
    • To secure seating
      • Loosened Homer’s hand to be able to grab chair arm while sitting straight
      • Loosened Marge’s hand to be able to grab chair arm while sitting straight
      • Added studs to Maggie’s seats
    • Added label
  • Added third-party lights (Light My Bricks) designed for this specific train
    • Modified cabling to allow 2-port Expansion Board connections between each train car -and- to support mods to original train design
    • Added a flickering Orange Bit light (and an orange flame piece) to smoke stack
    • Added a White Bit Light to both the Steam Dome and the Sand Dome
Remarks
My Re-MOC

Disney - Train Display Platform Cars

My Review
B 🟢 Functional design for displaying from high-up track
Designer
sbondi
Release Year
2020
Display
On train tracks connected to Disney Train (stored on floating shelf in Train Yard)
Figures
  • Car #1: Disney - Modern
    • Front Row
      • Genie
      • Aladdin [holding lamp]
      • Jasmine [holding dove]
      • Ariel [holding gem]
      • Stitch
      • Maleficent [holding scepter]
    • Back Row
      • Jafar [holding scepter]
      • Ursula [holding trident]
      • Olaf
  • Car #2: Pixar - Toy Story
    • Front Row
      • Woody
      • Buzz Lightyear
      • Rex
      • Ham
      • Alien
    • Back Row
      • Jessie on Bullseye
      • Army Man
      • Zurg
      • The Prospector
      • Lotso
  • Car #3: Marvel - Guardians of the Galaxy
    • Front Row
      • Star Lord [holding guns]
      • Gamora [holding sword]
      • Rocket Raccoon [holding big gun]
      • Groot (Teenager)
      • Groot (Baby)
      • Drax [holding knives]
      • Mantis
    • Back Row
      • Yondu
      • Taserface
      • Nebula [holding swords]
      • Ayesha
      • Ronan The Accuser [holding weapon]
  • Car #4: Star Wars
    • Front Row
      • Luke Skywalker (Jedi) [holding lightsaber]
      • Yoda [holding lightsaber]
      • R2-D2
      • C-3PO
      • Darth Vader [holding lightsaber]
      • General Grievous [holding lightsabers]
    • Back Row
      • Queen Amidala
      • Ahsoka Tano [holding lightsaber]
      • Chewbacca [holding crossbow]
      • Ewok
      • Emperor Palpatine
      • Stormtrooper [holding gun]
Design
  • Wanted the Disney train to carry the characters themselves, but from the high-up track a flat car hides everyone behind the front row - so I designed an angled colorful display platform to sit on a standard flat car.
  • In addition to angling the deck:
    • Used one trans-clear 1x2 plate (or 2x2 plate) to elevate each figure in the Front Row over the accent tile.
    • Used two trans-clear 1x2 bricks (or 2x2 bricks) to elevate each figure in the Back Row.
    • Used LEGO “weight' part in back to counter incline.
  • Colored the platform differently for each theme for visual distinction and colorfulness:
    • Star Wars: earthy signature tan (“sand”) accented with brown
    • Marvel: represented by Guardians of the Galaxy with magenta accented with signature purple
    • Pixar: represented by Toy Story with signature pink accented with royal blue
    • Disney: represented by modern classics with signature gold accented with teal
    • Note: Also added printed logo plaques under the platform to make the theme clear.
  • Chose characters and their placement (normally heroes first on the left and villains last on the right) and poses.
Remarks
My MOC

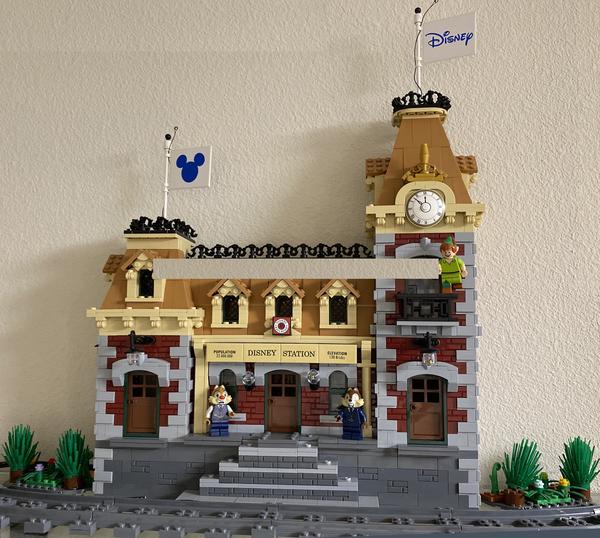
Disney - Train Station

My Review
B+ 🟢 Creative compression of depth to fit in space as well as nice-looking matching base to increase visibility over shelf/track
Re-MOC Designer
sbondi
Release Year
2020
Display
On glass shelf (with brackets) to support train curve on angled wall near front door
Sets
  • Disney Train and Station [just station]
Figures
  • On front porch
    • Chip
    • Dale
  • On balcony ledge
    • Peter Pan
Design
  • Re-designed for limited, high-up space
    • Made just 10 studs deep, not counting front porch extension
    • Focus was on the outside facade, especially since inside would not be seen / accessible
    • Since it would be up against a wall, the back part was made to appear essentially “cut off”, implying something more beyond the wall
    • Replaced one of the 8x16 Light Bluish Gray base plates with other parts due to reduced size
    • Cut two base plates on the top tower floor and one roof girder plate, since did not have tan parts for the needed reduced dimensions
    • Moved in most items from cut-off section, including chandelier (in closer in position)
    • In order to better be seen, added 4-brick-2-plate foundation with double stairway
    • Moved Disney Castle model to be visible through glass balcony door, and created a brown table for it with mods to hold its minimal stud design
    • Added extra custom wooden furniture piece in the back middle to not appear empty and to hide some hanging wires
    • Added external shrubbery patches on each side
    • Added external plumbing exposed on one side
  • Added third-party lights (Light My Bricks) designed for this specific train station
    • Replaced defective White Micro 30cm Bit Light with White Micro 15cm Bit Light
    • With one less 15cm Micro light (due to above) and also since one port broke on Micro Expansion Board, replaced light over balcony door with White 15cm Bit Light, and added another 6-port Expansion Board to support this
    • Due to an overly meticulous process of hiding all cables -and- since the station would never be seen from behind, did not follow all the detailed “cable hiding” instructions, rather simply ensured cables were hidden good enough to not be seen from outer windows/doors
    • Did not include the recommended Bit Light in the unseen attic section where Disney Castle model used to be
    • Added a White 15cm Bit Light to highlight each of the two flags
Remarks
My Re-MOC

Harry Potter - Hedwig

Display
On top of shelving unit
Sets
  • Hogwarts Icons (Collectors' Edition) [not including Golden Snitch, Hogwarts scarf, Hogwarts acceptance letter, chocolate frog, and golden icons with their display stage]
Figures
  • Hedwig

Harry Potter - Hogwarts

Display
Large diorama cube
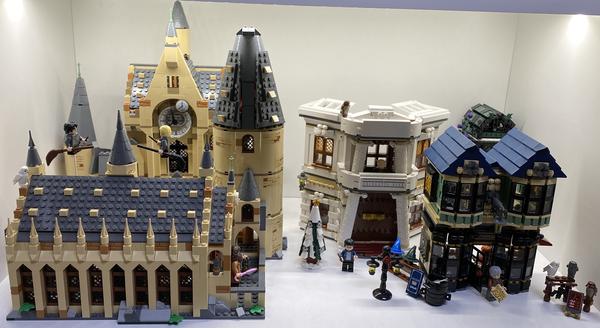
Sets
  • Hogwarts Great Hall
  • Hogwarts Clock Tower
  • Diagon Alley
Figures
  • All figures from sets, except older Hagrid
Mods
  • Put White Baseplates for the floor
  • Hogwarts Great Hall
    • Removed spear on top of tallest tower (since too tall for space), and modified top to round off
    • Suspended Harry and Malfoy in the air on top holding Quidditch brooms and their wands
    • Displayed Christmas tree in front of “Great Hall'
  • Hogwarts Clock Tower
    • Removed spear on top of tallest tower (since too tall for space)
    • Disconnected smaller tower section, and moved to other side of my main clock tower
    • Disconnected dance floor section, removed mechanism, and left ornamental portion for intimate dance area for Harry and Hermione in back of scene
    • Displayed tables with minifigs in front of clock tower

Harry Potter - Hogwarts Express Train

My Review
B+ 🟢 Dynamic scene of giant snake on rear car
Re-MOC Designer
sbondi
Release Year
2020
Display
On train tracks (stored in Hogwarts Express Train Station on floating shelf in Train Yard)
Sets
  • Hogwarts Express (75955-1)
Figures
  • Engine Car
    • Conductor (custom figure using second Professor Lupin’s torso)
  • Passenger Car
    • Inside
      • Professor Lupin
      • Trolley Witch
    • On Top
      • Ron [and his rat]
      • Dementors [2x]
  • Rear Car (custom)
    • Inside
      • Basilisk [body of giant snake is inside]
    • On Top
      • Harry [holding wand]
      • Hermione [holding wand]
      • Hagrid [holding umbrella]
      • Basilisk [head of giant snake is on top]
Design
  • Engine Car
    • Modified front wheel section to be more secure, while still flexible
    • Replaced rear car connector with magnetic buffer
  • Tender Car
    • Motorized with Powered Up motor/battery after re-designing to be large enough
    • Replaced front and rear car connectors with magnetic buffers
  • Passenger Car
    • Modified base plates on ends (and affected tile areas above in cabin) to accommodate plates with holes, allowing support for two standard rotating bogies (each with 4 wheels)
    • Replaced front and rear car connectors with magnetic buffers
  • Rear Passenger Car (added)
    • Based on Passenger Car (with mods above)
    • Modified giant snake to loop back by purchasing another tail S piece (to replace the good one), cutting it in half, and jamming in a LEGO connector piece into both halves in order to hold it back together in the opposite direction
  • Added third-party lights (Light My Bricks) designed for this specific train
    • Modified cabling to allow 2-port Expansion Board connections between each train car -and- to support mods to original train design
    • !TEMP
Remarks
  • My Re-MOC
  • Warning: Engine Car front wheels are mostly cosmetic and not really designed for motorization.

Harry Potter - Hogwarts Express Train Station

My Review
B 🟢 Clever inversion of model
Re-MOC Designer
sbondi
Release Year
2020
Display
On floating shelf (in Train Yard)
Sets
  • Hogwarts Express (75955-1)
Figures
  • On Stairs
    • Dobby [holding suitcase]
  • On Crosswalk
    • Draco Malfoy [holding wand]
Design
  • Completely converted to its mirror image to allow the train to be stored in the correct direction.
  • Initially delayed this for years due to my initial more complex vision of lighting the train and the station with the train somehow switching power from battery to the station feed when in the yard, but eventually realized that this would be too much for a subtle lighting effect, so just lit the minimal station lamps with third-party lights (Light My Bricks):
    • Converted third light over bottom of back stairway from an upward-facing clear bulb to the same downward-facing yellow cylinder, but coming off side to not block stairs.
    • Aside from those 3 lamps now in the back behind the trains, I decided to add a 4th lamp over Dobby at the top of the front stairway using my own parts in my own old timey yellow lamp post design.
    • Passed cables through hinged bracket hole, through wall, and pinched at floor with 1x1 light bluish-gray plate to force down.
Remarks
My Re-MOC

Heavy Haul Cargo Train (Theme Train)

My Review
B- 🟢 Nothing that special, but gets the job done
Re-MOC Designer
sbondi
Release Year
2020
Display
On train tracks connected to Theme Train cars (stored on floating shelf in Train Yard)
Sets
  • LEGO City Cargo Train [just engine car and engineer]
Figures
  • Inside
    • Engineer (driver)
Design
  • Converted from older train Power Functions to support Powered Up motor/battery
  • Re-designed with two train motors (i.e., two sets of motorized wheels) for extra hauling power
  • Added LEGO weight part in front to give traction to front set of motorized wheels
  • In order to keep the front set of motorized wheels in the same direction, cut a hole in train base plate to allow motor cable front access
  • Made roof more sturdy, and improved power button design
Remarks
  • My Re-MOC (engine car)
  • Replaced original cargo train cars with multi-themed custom train cars:
    • Some totally custom
    • Others with major mods
    • Also, all with extended buffers to better display front and back designs
    • Displayed in this order:
      • Scooby Doo Train Car
      • Star Wars - Clones Train Car
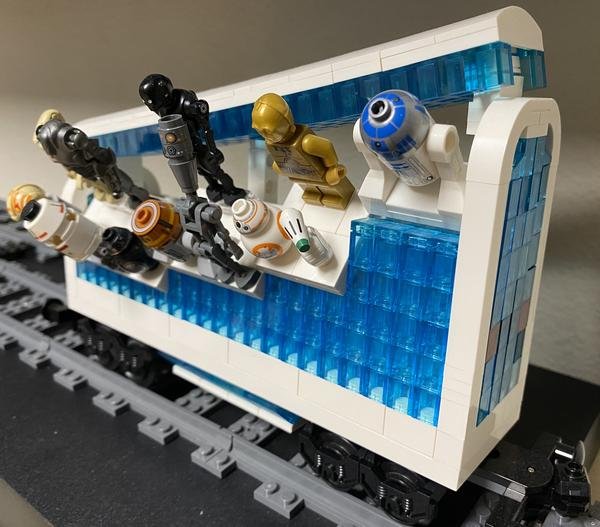
      • Star Wars - Droids Train Car
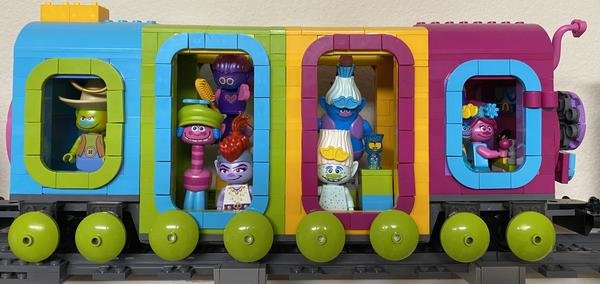
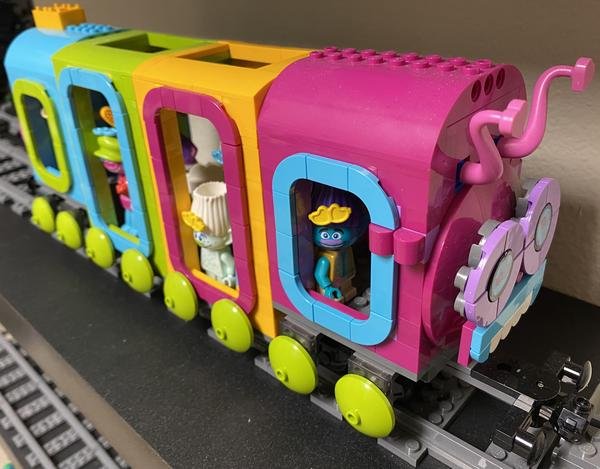
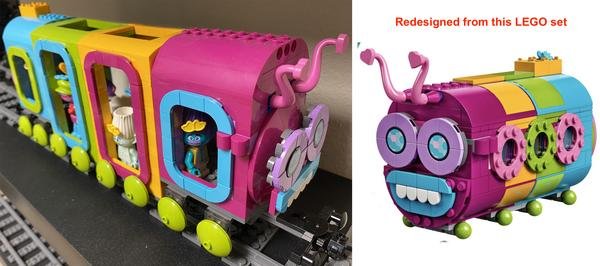
      • Trolls Club Car
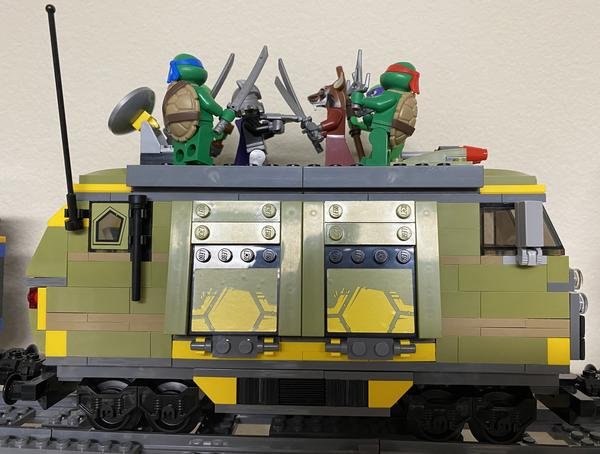
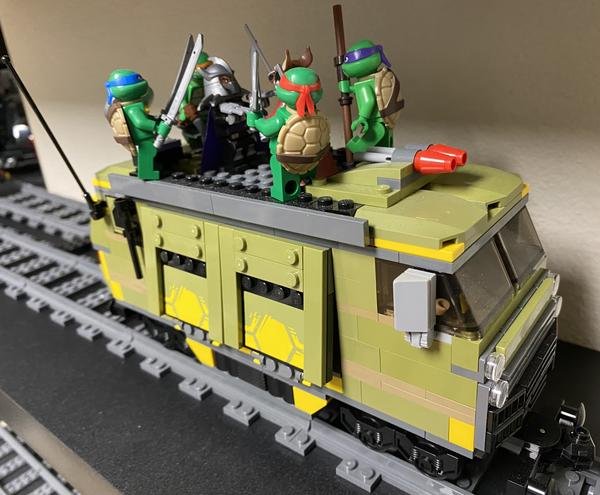
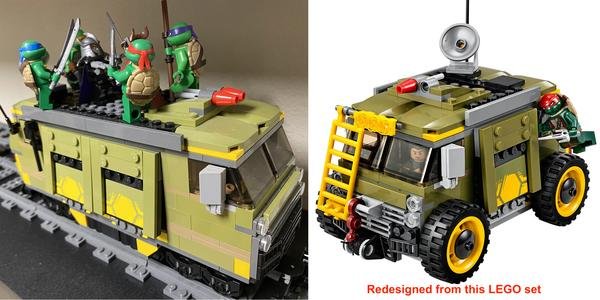
      • Teenage Mutant Ninja Turtles Train Car
      • Avengers - Club Car
      • Jurassic World Tram Car
  • Warning: Avoid driving backwards around curves, since some cars can easily de-rail

High Speed Passenger Train

My Review
B- 🟢 Nothing that special, but looks the way I wanted
Re-MOC Designer
sbondi
Release Year
2020
Display
On train tracks (stored on floating shelf in Train Yard)
Sets
  • LEGO City Passenger Train
Figures
  • Engine Car
    • Conductor
  • Passenger Car
    • (empty)
  • Dining Car
    • Server
    • Lady
    • Boy
Design
  • Engine Car
    • Re-designed with two train motors (i.e., two sets of motorized wheels) for speed
    • Added LEGO “weight' part in front to give traction to front set of motorized wheels
    • In order to keep the front set of motorized wheels in the same direction, cut a hole in train base plate to allow motor cable front access
  • Rear Engine Car (added in reverse position)
    • Re-designed to be passive without motorized wheels, battery box, and power button (mostly purchased that way)
  • Replaced all wheel holders/wheels (older metal-axle version) with new wheel holders/wheels
  • Added third-party lights (Light My Bricks) that are powered and controlled by the front motor channel of the Powered Up Hub
    • (similar to Subway train lighting)
    • Cool White 30cm Bit Lights: Headlights for front car
    • White 15cm Bit Light: Conductor cabin light
    • Warm White Strip Lights (2x): For each passenger cabin’s lights
    • Red 30cm Bit Lights: rear car warning lights
    • Various Connector Cables and Expansion Boards
Remarks
  • My Re-MOC
  • Warning: Note that Speed 8 seems fastest while safe, 9 seems about to fall off, and 10 will definitely fall off after front/rear curve

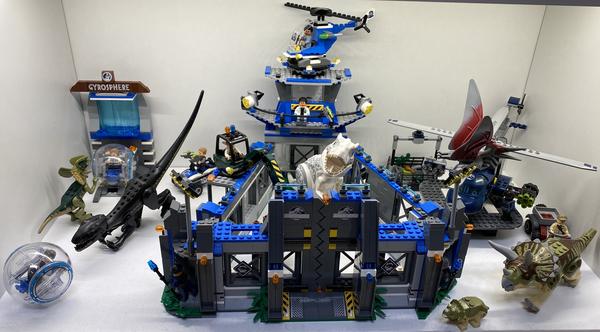
Jurassic World - Indominus Complex

Display
Large diorama cube
Sets
  • Indominus rex Breakout
  • Blue's Helicopter Pursuit [just Helicopter, Helicopter Transport Cage, and Red Quad Bike]
  • Raptor Escape [just Quad Bike]
  • Dilophosaurus Ambush [just extra Gyrosphere]
Figures
  • All figures from sets
  • Simon Masrani [in small helicopter]
  • Various dinosaurs
    • Indominus rex
    • Indoraptor
    • Dilophosaurus (Dark Tan) [and not the one from 'Dilophosaurus Ambush” set]
    • Triceratops
    • Triceratops Baby
    • Pteranodon
Mods
  • Put Light Bluish Gray Baseplates for the floor
  • Added large green “grass” area in front of complex
  • Indominus rex Breakout
    • Removed Gyrosphere ramp and structure from the complex
    • Modified “Gyrosphere' section to be more like analogous 'outpost' section
    • Created more complex Gyrosphere launch facility separate from the complex
  • Blue's Helicopter Pursuit
    • Created landing pad (with “H”) to raise helicopter blades above complex

Jurassic World - Park

Display
Large diorama cube
Sets
  • Dilophosaurus Outpost Attack
  • Dilophosaurus Ambush [just 4x4 and dinosaur]
  • Stygimoloch Breakout
  • T. rex Transport
Figures
  • All figures from sets
  • Owen Grady (Backpack)
  • Claire Dearing
  • Maisie Lockwood
  • Franklin Webb
  • Zia Rodriguez
  • Barry
  • Vet (Bowl Haircut)
  • All minifigs from 'Jurassic Park ~ T. rex Rampage'
  • Various dinosaurs
    • T. rex
    • 4 Raptors (Blue, Charlie, Delta, Echo)
    • Stygimoloch
    • Dilophosaurus (bright green)
    • Baby dinosaur [from the 'Jurassic Park ~ T. rex Rampage” set]
    • Ankylosaurus Baby
Mods
  • Put Bright Green Baseplates for the floor
  • Dilophosaurus Outpost Attack
    • Changed order of sections
    • Added 'Viewing area' section to extend wall

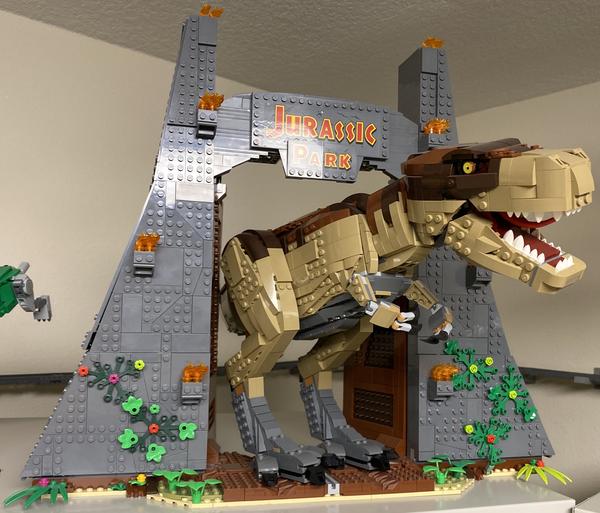
Jurassic World - T. rex Breakout

Display
On top of shelving unit
Sets
  • Jurassic Park ~ T. rex Rampage
Figures
  • T. rex

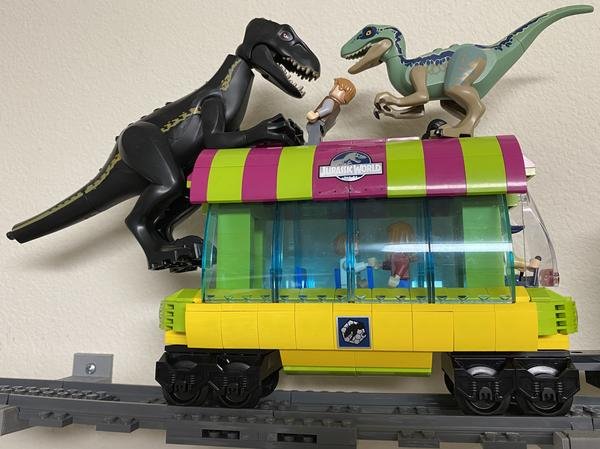
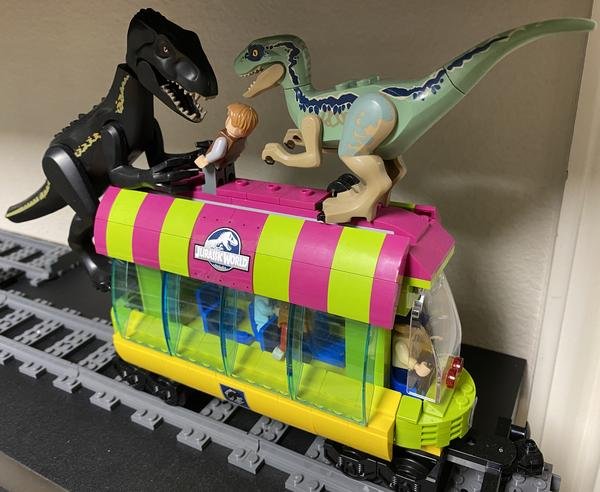
Jurassic World Tram Car

My Review
B+ 🟢 Mostly matches look of iconic jeep, and nice dynamic scene of dinosaur fight on top
Designer
sbondi
Release Year
2020
Display
On train tracks connected to Theme Train (stored on floating shelf in Train Yard)
Sets
  • City Square (60097-1) (design inspiration for tram style)
Figures
  • Inside
    • Park Worker [conductor]
    • Claire
    • Maisie
  • On Top
    • Owen
    • Blue
    • Indoraptor
Design
  • Kept some part types from the inspiration set, but changed colors to those of the signature Jeep and adopted a big-window tram design.
  • Tore off end of Indoraptor’s tail, since was so long that it disrupted train (Story: “Blue bit off end of Indoraptor’s tail, but it is growing back”).
Remarks
My MOC

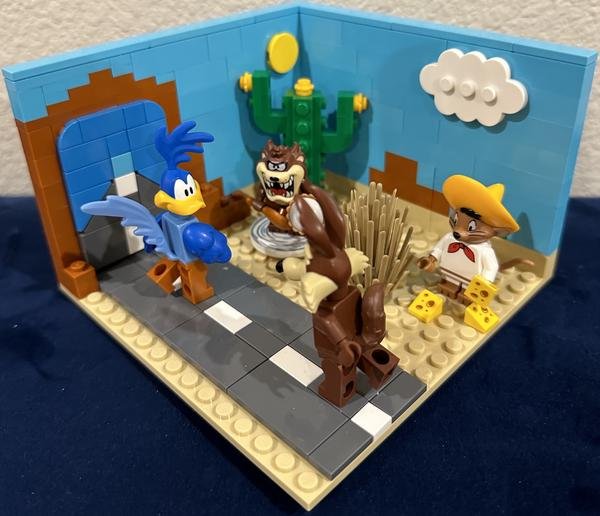
Looney Tunes Desert Habitat

My Review
A 🟢 Iconic cartoon scene despite limited detail
Designer
sbondi
Release Year
2022
Display
On floating shelf
Figures
  • Roadrunner (in front of fake tunnel)
  • Wile E. Coyote (on road headed towards fake tunnel)
  • Tasmanian Devil [holding turkey leg and pie, and on spinner] (near cactus)
  • Speedy Gonzales [holding chunk of cheese and with two chunks on desert floor] (near desert bush)
Design
  • Came up with my own custom desert scene design focused on a highway from the classic Road Runner cartoons.
  • Put Coyote and Road Runner on the highway, and ended the highway at a mountain with a fake tunnel painted over it as in the classic cartoon.
  • Included the other two characters in the set mostly associated with the desert: Taz and Speedy.
  • Added a cactus (slightly altered from an internet design), desert bush part, the sun, a cloud, a far-away mountain range, and a far-away cactus to complete the look.
Remarks
My MOC

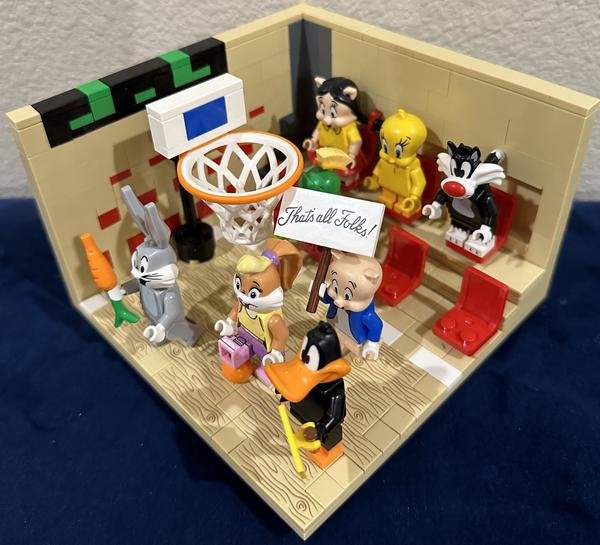
Looney Tunes Space Jam Habitat

My Review
A 🟢 Nice basketball court scene, incorporating many remaining characters
Designer
sbondi
Release Year
2022
Display
On floating shelf
Figures
  • On court
    • Bugs Bunny [holding carrot]
    • Daffy Duck [holding Rabbit Season sign]
    • Lola Bunny [standing on basketball]
    • Porky Pig [holding That's All Folks! sign]
  • In stands
    • Petunia Pig [no space to hold her tea pot]
    • Marvin the Martian [holding ray gun]
    • Tweety Bird
    • Sylvester the Cat
Design
  • Came up with my own custom basketball court scene design based on the unique Space Jam character, Lola Bunny, being in the set.
  • Put just four principal players on the court: Bugs, Lola, Daffy, and Porky.
  • Put the remaining characters (not in the Desert scene) in the stands: Sylvester, Tweety, Petunia, and Marvin.
  • Added a basketball hoop/basket/pole, a stop-clock board on top of the basket, and part of the scoreboard in the background.
Remarks
My MOC

MODOK (My Re-MOC)

My Review
B 🟢 Good-looking compressed design
Re-MOC Designer
sbondi
Release Year
2021
Design
  • Grabbed MODOK in his chair from set 76153, but he was far too wide to be placed sideways into my scene.
  • So I substituted the much smaller sh101 minifig head for the set’s large printed face panel, and re-built the body around the smaller head at reduced scale, keeping the signature elements intact (headband, gold side armor, chest monitor, and twin cannons).
Remarks
Part of Avengers - Tower scene

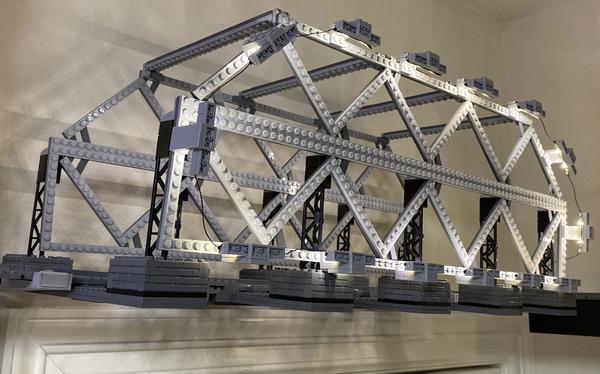
Metal Girder Bridge

My Review
B+ 🟢 Nice semi-realistic-looking design, especially with strategically placed lights
Designer
sbondi
Release Year
2020
Display
Supported over door with longer brackets for train passing
Design
  • Knew I wanted two types of bridges on the expanses across the window and the door, and I had an image in my head of the two kinds of bridges that I always liked: a Stone Castle Bridge for the window, and a Metal Girder bridge for the door.
  • Imagined the Metal Girder bridge just like I remembered them in New York - mostly at night, illuminated with lights - so I thought that would add to the atmospheric feel of my custom LEGO subway train riding around at night across the lighted bridge and the lighted Statue of Liberty.
  • Researched images of girder bridges and LEGO girder bridges to inspire my own custom design.
  • To get the look I wanted (including the lighting), did my best to better secure the delicate girder connections.
  • Added third-party lights (Light My Bricks).
Remarks
My MOC

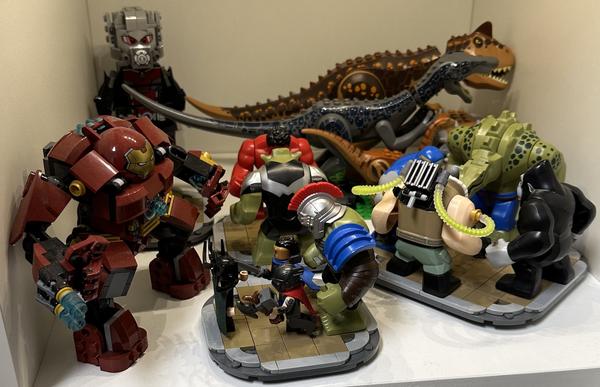
Minifigs - Big Figs

Display
Small diorama cube
Sets
  • The Hulkbuster Smash [just Hulkbuster suit and Iron Man minifig]
Figures
  • Thor: Ragnarok
    • Hulkbuster [with Tony Stark / Iron Man inside]
    • Hulk
    • Thor [built Thor’s “Infinity Hammer']
    • Valkyrie
    • Hela
  • The Angry Birds Movie
    • Mighty Eagle
    • Bomb
  • Jurassic World
    • Carnotaurus
    • Baryonyx
    • Gallimimus
    • Ankylosaurus

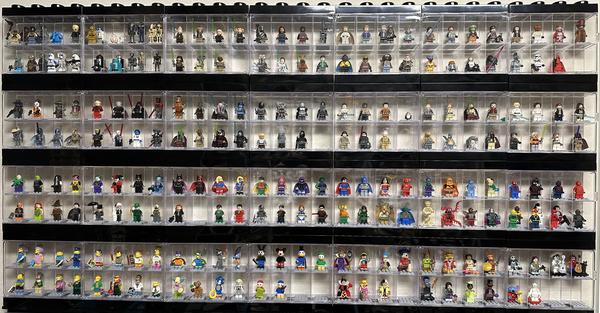
Minifigs - Cases

Display
In cases against wall on floating shelf
Figures
  • Star Wars (14 cases)
    • Episodes 1/2/3
    • Episode 4/5/6
    • Episodes 7/8/9
    • Rogue One
    • Clone Wars
    • Rebels
    • Resistance
    • LEGO Star Wars
    • The Mandalorian
    • The Bad Batch
  • Note: divided cases by source as well as droids, Jedi's, bad guys (Sith, etc.), and bounty hunters
  • Marvel Superheroes (2 cases)
    • Spider-Man and friends (1 case)
    • Spider-Man villains (1 case)
  • DC Superheroes (5 cases)
    • Justice League (1 case)
    • Justice League - DCEU (1 case)
    • Teen Titans (1 case)
    • Other DC Majors (1 case)
    • DC Villains (2 cases)
  • Disney (7 cases)
    • Note: somewhat in release order (including Pixar)
  • Special Characters (1 case)
    • Gizmo (Gremlins)
    • Stripe (Gremlins)
    • E.T.
    • Sonic
    • Beetlejuice
    • B.A. Baracus (The A Team)
    • Doc Brown (Back to the Future)
    • Marty McFly (Back to the Future)

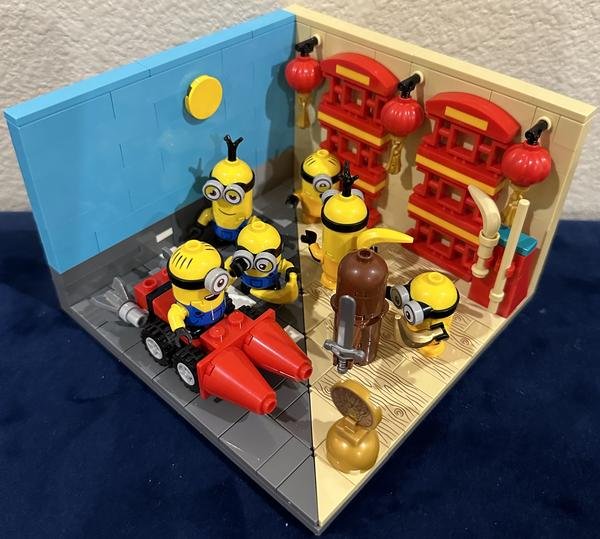
Minions Habitat

My Review
B+ 🟢 Interesting dual-scene design, heavily based on sets
Designer
sbondi
Release Year
2022
Display
On floating shelf
Sets
  • Minions Kung Fu Battle (75550-1) [just dojo dummy, weapons rack, background lanterns/decorations, golden banana weapon, and golden coin trophy]
  • Unstoppable Bike Chase (75549-1) [design for Rocket Car]
Figures
  • Rocket Car scene
    • Minion Stuart [in rocket car]
    • Minion Kevin
    • Minion Bob [holding banana]
  • Kung Fu Dojo scene
    • Minion Stuart
    • Minion Kevin
    • Minion Bob [holding golden banana weapon]
Design
  • While the artifacts come from the official sets, conceived of both of the scenes and the dual-scene design.
  • Did a bit more custom design on all the other 9 of 10 habitats, while with this last one, I mostly came up with the dual scene design (divided diagonally), but I based it more on content from the sets.
  • As such, did very little decoration on the floors and walls.
  • For the Kung Fu Dojo scene, it took me some time to distill what I wanted from the bigger/taller set into the habitat.
Remarks
My MOC

Pirates of the Caribbean

Display
On top of shelving unit
Sets
  • The Black Pearl
Figures
  • All figures from set
  • Elizabeth
  • Hadras
  • Mermaid [placed outside of ship]
  • Mermaid Serena [placed outside of ship]
  • Blackbeard
Mods
  • Created water base for ship, so bottom can be seen above high cabinets
  • Created rock base (with water under tip) for mermaids

Predator (Fan MOC)

My Review
B+ 🟢 Decent organic-looking and source-accurate model
Designer
buildbetterbricks
Product ID
MOC-40667
Release Year
2020
Pieces
488
Instructions
Rebrickable.com
Remarks
Part of Alien vs. Predator scene

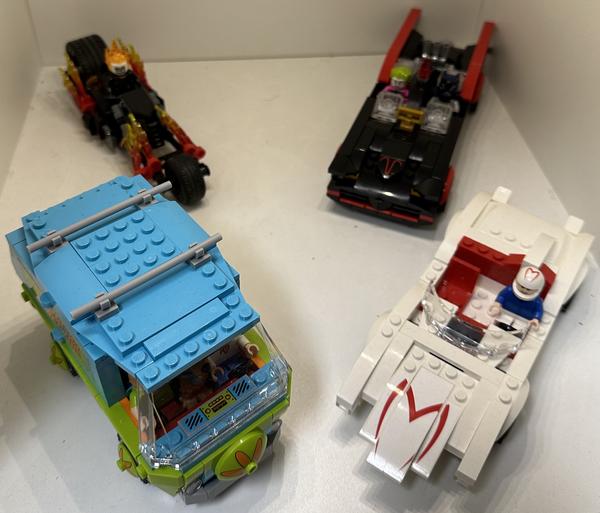
Sci-Fi/Fantasy - Vehicles

Display
Small diorama cube
Sets
  • Batman Classic TV Series Batmobile
  • Speed Racer & Snake Oiler [just Speed Racer and his car]
  • Spider-Man ~ Ghost Rider Team-up [just Ghost Rider and his bike]
  • The Mystery Machine [not villain nor tree]
Figures
  • Batmobile
    • Batman [Adam West]
    • Joker [Cesar Romero] [in handcuffs]
  • The Mach 5
    • Speed Racer
  • The Mystery Machine
    • Fred
    • Shaggy
    • Scooby (sitting)
  • Hell Cycle
    • Ghost Rider
  • Spider-man mini-scene
    • Iron Spider
    • Doc Ock
Mods
  • The Mystery Machine
    • Swapped out “walking” Scooby with “sitting” Scooby
    • Slimmed out middle divider (and smoothed out opening to back) to accommodate “sitting” Scooby on front seat

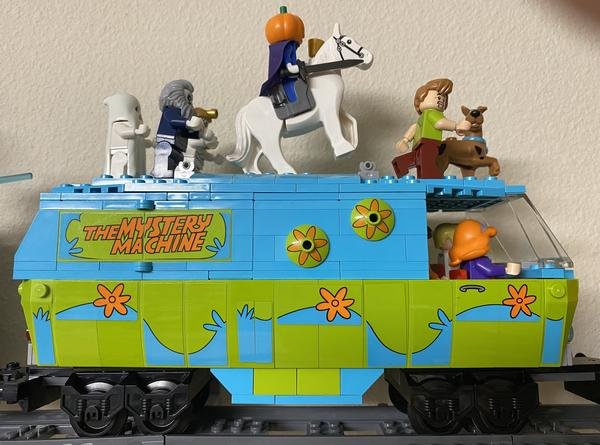
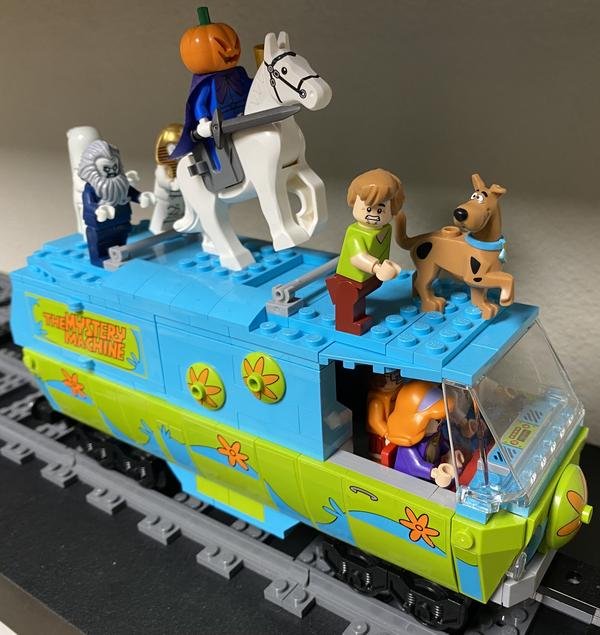
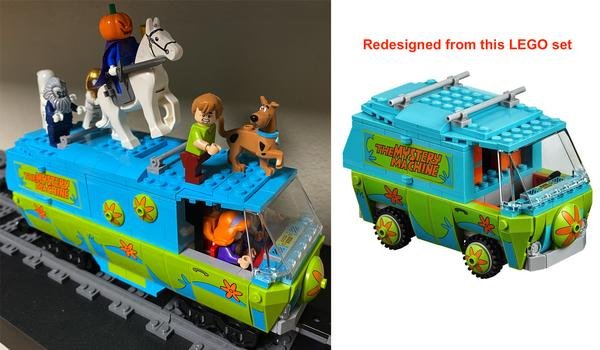
Scooby Doo Train Car

My Review
A 🟢 Cool implementation of iconic van in train car form
Designer
sbondi
Release Year
2020
Display
On train tracks connected to Theme Train (stored on floating shelf in Train Yard)
Sets
  • The Mystery Machine [just van]
Figures
  • Inside
    • Fred [driver]
    • Daphne (Passenger)
    • Velma [standing behind driver/passenger]
  • On Top
    • Scooby
    • Shaggie
    • Headless Horseman
    • Ghost
    • Mummy
    • Lighthouse Keeper
Design
  • Created train car based on design of Mystery Machine Van
    • Re-designed 6x16 original design with 4 puny wheels to fit on 6x24 standard train base plate with two rotating bogies each holding 4 train wheels
    • Removed tires and tire assembly on bottom
    • Replaced shorter panels that allowed for tires (this includes door panels) with longer panels that go to floor
    • Expanded middle section by 8 studs; decorated with flower hub caps from tires
    • Expanded ceiling to cover additional studs
    • Purchased extra sticker set and pieces to support new design
    • Retained most of design of lab in back
    • Transferred rear shorter panel stickers to larger panels in order to use new ones on added section
    • Added matching multi-color underbelly
Remarks
My MOC

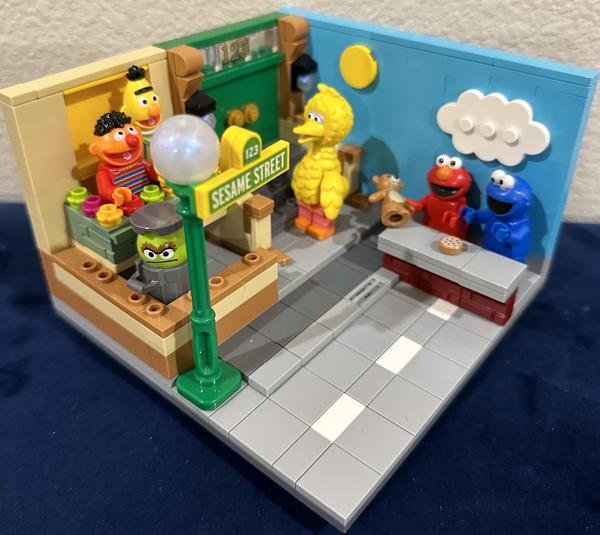
Sesame Street Habitat

My Review
A 🟢 Nicer way to display these iconic characters compared to very basic set
Designer
sbondi
Release Year
2022
Display
On floating shelf
Sets
  • 123 Sesame Street (21324-1) (basis of building facade design)
Figures
  • On stoop
    • Big Bird
  • In Bert & Ernie's window box
    • Ernie [holding rubber ducky]
    • Bert
  • In dumpster area
    • Oscar [in garbage cab]
  • Behind brick wall
    • Cookie Monster [cookie in front]
    • Elmo [holding teddybear]
Design
  • While considering aspects of the official set (street sign, door, etc.), created my own dual scene concept in a small space.
  • Altered the main entry/stairs/stoop design from the official set, adjusting the height within the habitat constraint.
  • Completely re-designed Ernie and Bernie's basic apartment window from the official set, incorporating Ernie's window box with flowers.
  • Compressed the 'garbage area' from the official set to fit Oscar's garbage can within the habitat constraint.
  • Designed my own sidewalk and street.
  • Added a separate section for the classic Muppet wall (red brick wall, cement top, and sky/cloud backdrop), and put Cookie Monster and Elmo there.
  • Added the sun (in addition to the cloud with the wall) and the Sesame Street sign to complete the look.
Remarks
My MOC

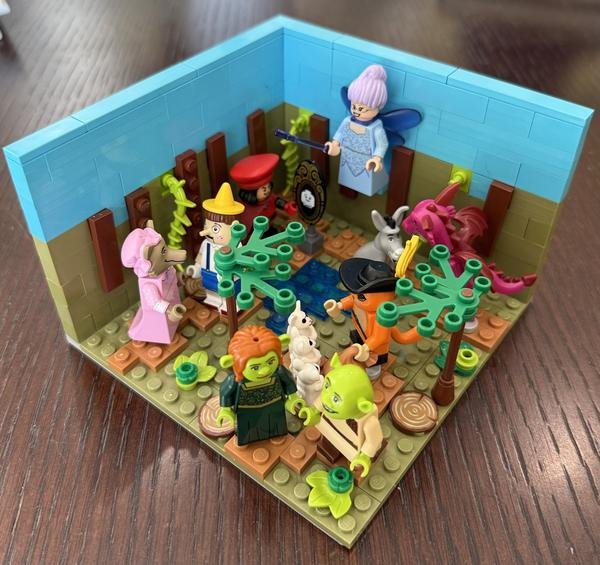
Shrek Habitat

My Review
A 🟢 Dense swamp with 5 viewable mini-scenes
Designer
sbondi
Release Year
2026
Display
On wire shelf (on top of large cube column)
Figures
  • Shrek and Fiona [holding hands]
  • Pinocchio and Big Bad Wolf [conversing]
  • Puss in Boots and Three Blind Mice [meeting]
  • Lord Farquaad and Magic Mirror [conversing]
  • Donkey and Dragon [conversing]
  • Fairy Godmother [floating in air]
Design
  • Wanting to include as many characters as possible from the set (12 + 4 extra), felt these were all the worthy ones, and would not overcrowd the scene.
  • Decided to group them in order to cover the key interactions.
  • Tested various heights for the background swamp, and determined that 5 bricks (covering the height of the minifigs) gave the most immersive effect - with a sky above that.
  • While the swamp ground is studded olive-green, I overlaid medium nougat walking paths throughout to place the characters.
  • Broke up the background olive-green swamp with brown faraway studded trees and bright green swamp vines.
  • Accommodated Fairy Godmother by elevating her in the air.
  • Added a swamp water feature.
  • Added foreground swamp trees, cut tree stumps, and swamp leaves.
Remarks
My MOC

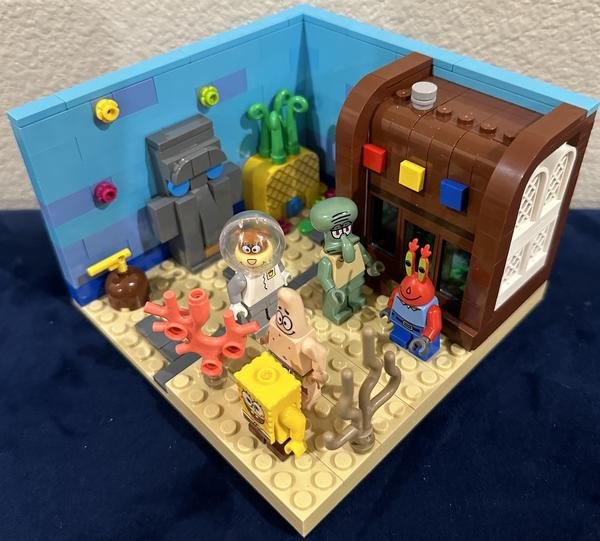
SpongeBob Habitat

My Review
A 🟢 Compact nice-looking way to display iconic characters
Designer
sbondi
Release Year
2022
Display
On floating shelf
Figures
  • In front of Krusty Krab
    • Mr. Krabs
    • Squidward
  • Next to coral
    • SpongeBob
    • Patrick
    • Sandy Cheeks
Design
  • Conceived of this design from images of the cartoon, and then creatively positioned a mini but recognizable Krusty Krab up front with the characters, and the houses in the distance (forced perspective).
  • Created a far-away part of the scene with the 3 iconic houses of SpongeBob, Squidward, and Patrick:
    • My initial scene design idea was to display at least the facades of these iconic houses in minifig scale, but I could not find a way to make the pineapple design look right with LEGO parts :-(
    • However, when saw the upper-half of a printed pineapple part from a LEGO fruit juice truck set, I realized that I could make the 3 iconic houses in a much smaller scale as a far-away part of the scene.
    • Explored different Easter Island Head designs for Squidward's house, before ending up with my own custom design that more closely matches the cartoon.
    • At this scale, Patrick's rock house became a very simple build.
    • Also added the roads to the highway.
  • Created a foreground scene to display the characters:
    • Increased the half of the habitat for the foreground scene by two plates to hopefully differentiate the perspective.
    • Made my own compressed MOC of the Krusty Krab (sticking with Reddish Brown for the color due to parts availability) for the foreground scene to allow Mr. Krab and Squidward to stand in front of it.
    • Put SpongeBob, Patrick, and Sally standing near some coral.
  • For the backgrounds, emulated the different shades of blue with colorful flower designs from the cartoon.
Remarks
My MOC

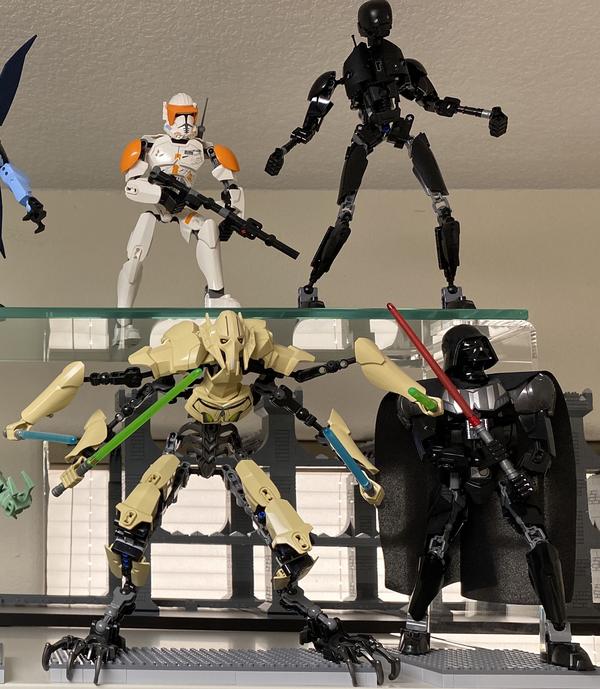
Star Wars - Buildable Figures

Display
On top of shelving unit with acrylic shelf in back for second row of figures
Sets/Figures
  • Top Level
    • K-2SO
    • Clone Commander Cody
  • Bottom Level (on base platforms)
    • General Grievous
    • Darth Vader

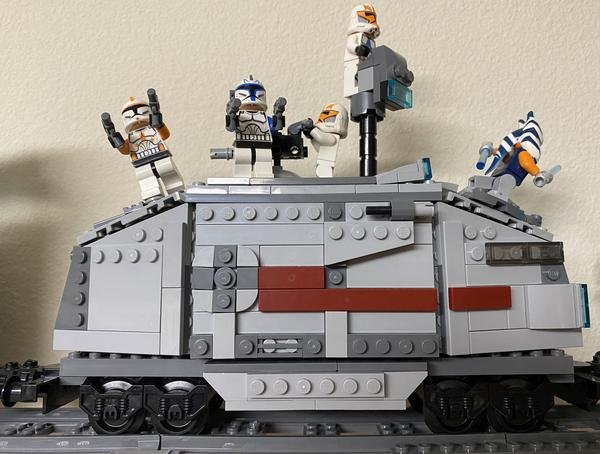
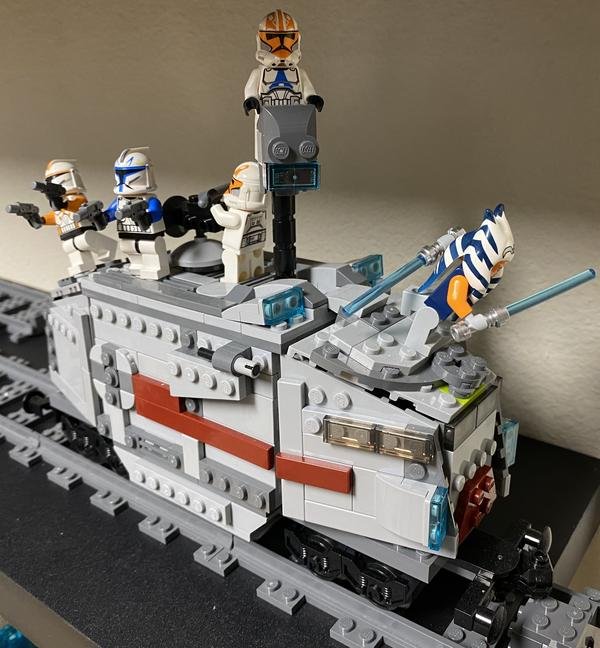
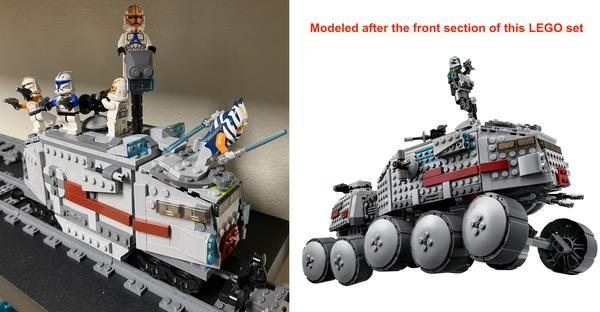
Star Wars - Clones Train Car

My Review
A 🟢 Cool implementation of iconic tank in train car form
Designer
sbondi
Release Year
2020
Display
On train tracks connected to Theme Train (stored on floating shelf in Train Yard)
Sets
  • Clone Turbo Tank (75151-1) (heavily inspired design)
Figures
  • On Top
    • Ahsoka Tano (Adult)
    • Captain Rex
    • Commander Cody
    • 332 Clone Trooper [on rotating gun]
    • 332 Clone Trooper [on periscope]
Design
  • Trial-and-error with new pieces to replicate most of the front section design in the new form factor (24x8 limitations):
    • Aside from many adjustments to bring it in from the inspired design’s 10-stud width, also streamlined/slimmed down the front hood section, significantly reduced the amount of studs on the wall panels, and tightened up the hinge connection
  • Added matching train underbelly to look heftier
  • Being hefty with its 8-stud width, had to slim down roof headlight design to barely clear the 4-and-1/8-inch clearance of the Disney Train Station
Remarks
My MOC

Star Wars - Droids

Display
On floating shelf
Sets
  • C-3PO (2024)
  • R2-D2 (2024)
Mods
  • For C-3PO, did not use the built-in base, plaque/stand, or minifigs.
    • Removed the built-in base under him (it made him too tall for my floating shelves), and reinforced the foot-to-shin connection, leaving the above-foot stud on both legs one stud higher (and gold colored for the gold leg, instead of contrasting silver).
  • For R2-D2, did not use the extended utility arms, plaque/stand, or minifigs.
    • Even though is barely noticeable with him placed on high shelves in his iconic leaning-back pose, redesigned bad stud-fill dome design, but quarter-sphere smooth pieces were not made in Light Bluish Gray yet.
    • Also, redesigned the lower blue area to be slicker, but abandoned it with rest of dome.

Star Wars - Droids Train Car

My Review
A 🟢 Unique futuristic display car design
Designer
sbondi
Release Year
2020
Display
On train tracks connected to Theme Train (stored on floating shelf in Train Yard)
Figures
  • Level 1 (highest)
    • R2-D2
  • Level 2
    • C3-PO
    • BB-8
    • D-O
  • Level 3
    • Chopper
    • K-2SO
    • IG-88
  • Level 4
    • Bucket
    • DD-BD
    • BB-9E
    • Battle Droid (Security)
    • Battle Droid (Super)
Design
  • When conceived of a train car that would showcase all the cool Star Wars droids, found no set to inspire it, so created my own totally custom train car design.
  • The droids were relatively small, so to be seen from the high-up train tracks, designed a multi-tier inclined design.
  • Each tier has a platform that mostly groups related droids together, and puts the OG Star Wars droid R2-D2 at the top by himself.
  • Used an antiseptic white base (inspired by Star Wars Imperial ship interiors) with a futuristic incline across the train car and transparent blue bricks to complete the slick design.
Remarks
My MOC

Star Wars - Hoth

Display
Large diorama cube
Sets
  • AT-AT
  • AT-ST Walker
  • Hoth Wampa Cave
  • Snowspeeder
Figures
  • All figures from sets, except Baze Malbus and Rebel Trooper
  • Han Solo (with parka hood) [on tauntaun]
Mods
  • Put White Baseplates for the floor
  • Suspended snowspeeders in air by adding transparent block to bottom
  • Created various snow chunks, including one with “poop” under AT-AT
  • Added fire blasts to forward guns on AT-ST and both snowspeeders
  • For safety (on both walkers)
    • Replaced with 'dummy' projectiles (cut-off tips) for display (will not shoot)

Star Wars - Jabba's Palace (My Re-MOC)

My Review
B 🟢 Although first mountainside I created is not great, it works, and wall plus stairway add to scene
Re-MOC Designer
sbondi
Release Year
2021
Sets
  • Jabba's Palace
  • Rancor Pit
Figures
  • All figures from set
Design
  • Positioned palace on top of Rancor pit
    • However, not as designed - rather making palace interior face front and Rancor gate face the right side (raised enough to stick Rancor's snout out)
    • Cut Rancor gate to be much smaller. allowing Jabba's Palace to correctly sit on top
    • Removed gate handle play feature - just used unobtrusive pins to hold gate in place
  • Created mountain terrain in front to account for raising palace
  • Modified Entrance Tower
    • Disconnected from palace and moved up front
      • Replaced both palace and tower connector pieces with smooth, color-consistent pieces
    • Shrunk tower height to fit with being raised
    • Moved gate lever forward one stud to support shorter tower
    • Created stairway from tower to palace
      • Removed front door rear bottom support which was not critical, and interfered with stairway design
    • Created wall next to tower
Remarks
Part of Star Wars - Tatooine scene

Star Wars - Luke's Landspeeder (Minifig Scale) (Fan MOC)

My Review
B+ 🟢 Sleek design, even though smaller than expected and not thrilled with double-windshield-look, light gray front pieces, and weak grill (only three conduits on side and none in front)
Designer
Fuku Saku
Release Year
2021
Pieces
319
Instructions
brickvault.toys
Remarks
Part of Star Wars - Tatooine scene; alternate build with more rare parts

Star Wars - Millennium Falcon

My Review
A 🟢 Major improvement of stud-heavy exterior, including significant additional detail
Re-MOC Designer
sbondi
Release Year
2021
Display
On wire shelf
Sets
  • Millennium Falcon (2019 version)
Figures
  • All figures from 2015 set
    • Han Solo (old) [pilot]
    • Chewbacca (older)
    • Rey
    • Finn
    • BB-8
    • Tasu Leech
    • Kanjiklub Gang Member
  • Kylo Ren
  • R2-D2 [2019 set]
  • C-3PO [2019 set]
  • D-O [2019 set]
Design
  • Note that original Re-MOC was based on 2015 'Force Awakens' version, and I wanted to maintain that version here to keep old Han Solo as pilot
  • Re-designed with cleaner look
    • On the surface
      • Replaced virtually all exterior Dark Bluish Gray pieces with Light Bluish Gray pieces, including:
        • Half-slices
        • Center ring pieces
        • Center cylinder pieces
        • Cockpit pieces
      • Tiled over virtually all studs
        • Sometimes integrated features within tile layer, and sometimes raised them above tile layer when applicable
        • Covered 3 hinges with 1x4 tile pieces for aesthetics, so can not open compartments beyond 90 degrees
        • More drastically re-designed front center section to better support thicker ramp landing as low as possible
        • Replaced stud-heavy protruding circles with tiled quarter-circles integrated in tile layer
      • Further detailed to better reflect movie version
        • Replaced 2019 round satellite dish with 2015 rectangular version
        • Replaced 2019 simple circle under top guns with 2015 'rear detail' (sticker) version
        • Completely redesigned center cylinder rim
        • Added detailed conduit lines, especially in front (including replacing the simplistic ones on front center surface)
        • Altered some Dark Red, Dark Tan, and Dark Bluish Gray pieces to better represent colors
        • Improved 'black circle hole' (and related conduits) on section between cockpit and front center surface
        • Made bigger base (connected to conduit) for satellite dish
        • Improved 'black trapezoid hole' (and related conduits) on each section on rear side adjacent to center cylinder
        • Expanded red triangle under top guns to better match movie version
        • Expanded damage holes on front side
          • On the left of front center surface
          • On the left of center cylinder
        • Improved detail on center cylinder
        • Improved rear 4 'tower' pieces to be more accurate to movie version
          • Placed 1x1 tile on top of each to represent 'flat head'
          • Re-positioned better relative to center dishes
          • Better placed Dark Red detail closer to movie version
          • Added mini-cylinder pieces (same as ones on center ring section) in front of all towers as in movie version
        • Added electronics tile below each of the bottom three discs in the rear, and above the middle top disc
        • Expanded the structure between the 2 sets of towers
    • Inside
      • Tiled floor under front center section
      • Replaced 2019 simple hyper coil with 2015 more detailed engine
        • Integrated with technic pins for escape hatch
  • For safety
    • Replaced with 'dummy' projectiles (cut-off tips) for display (will not shoot)
Remarks
My Re-MOC

Star Wars - Mos Eisley Cantina (My Re-MOC)

My Review
B 🟢 Nice extended exterior to fit space
Re-MOC Designer
sbondi
Release Year
2021
Sets
  • Mos Eisley Cantina (2020 Master Builders Series set) [nothing from outside the cantina, except the moisture evaporators and dewback pen]
  • Star Wars - Luke's Landspeeder (Minifig Scale) (Fan MOC)
Figures
  • All figures from cantina set
  • Bossk
  • Dengar
  • Ree Yees
Design
  • Due to space limitations and my desired layout, did not use any build from outside cantina (except moisture evaporators and dewback pen):
    • Tatooine houses
    • Greedo's ship
    • Villain landspeeder
    • Cargo section (not really seen in the back)
  • Removed/replaced outside connectors to allow for more flexibility while giving the cantina a cleaner look
  • Squared out connected exterior to line up with display space
    • Filled in furthest end of front side
      • Connected larger moisture evaporator to it
  • Created single-unit, detached exterior for back side
    • Integrated dewback pen with mods
      • Squared out base ends to integrate with rest of unit
      • Expanded and integrated food and water bins into side pen wall (moving forward to allow dewback tail to comfortably rest inside space)
      • Replaced bone with larger one from 2014 set
    • Connected smaller moisture evaporator on furthest end
  • Created single-unit, detached exterior for visible side of building
    • Connected landspeeder with Luke and C-3PO
      • Used Luke's Landspeeder (Minifig Scale) (Fan MOC)
      • Suspended in air by adding transparent block to bottom
    • Connected curious Jawa
Remarks
Part of Star Wars - Tatooine scene

Star Wars - Ships

Display
Small diorama cube
Sets
  • TIE Fighter
  • Jedi Interceptor
Figures
  • TIE Fighter
    • TIE Fighter Pilot [pilot]
  • Jedi Interceptor
    • Anakin Skywalker [pilot]
    • R2-D2 [in mech compartment]
Mods
  • (both ships) Created transparent stands to display in 'active' chase positions
  • Jedi Interceptor
    • For safety
      • Replaced with 'dummy' projectiles (cut-off tips) for display (will not shoot)

Star Wars - Tatooine

Display
Large diorama cube
Sets
  • Star Wars - Mos Eisley Cantina (My Re-MOC)
  • Star Wars - Jabba's Palace (My Re-MOC)
Figures
  • Mos Eisley's Cantina
    • See MOC notes
  • Luke's Landspeeder (from 'Luke Skywalker's Landspeeder (2020)' set)
    • Luke Skywalker (in poncho) [driver]
    • C-3PO
  • Jabba's Palace
    • See MOC notes
Mods
  • See MOC notes

Star Wars - The Child

Display
On top of shelving unit
Sets/Figures
  • The Child

Statue of Liberty

Display
On 12”x10” floating shelf on wall behind door (to support train curve)
Sets
  • Statue of Liberty
Mods
  • Added base extension with 2 weights and 5-stud connection points to train track to better secure statue, since a decent portion hangs off shelf
  • Added third-party lights (Light My Bricks)
    • Added an Orange Bit light torch
    • Added left/right Warm White Strip lights, elevated from bottom of statue (not pedestal)
    • Added left/right Warm White Strip lights with trans-yellow 1x1 headlight parts taped over LED's, suspended right at the bottom of the pedestal

Steamboat Willie Habitat

My Review
B 🟢 Decent representation of original design at less than 25% scale
Designer
sbondi
Release Year
2022
Display
On wire shelf (on top of large cube column)
Sets
  • Steamboat Willie (21317-1) (basis of miniature design)
Figures
  • [with steering wheel]
  • [with lifesaver]
Design
  • While the steamboat is simply a mini-MOC of the one in the original set, re-imagined the characters stranded on a rock with the steamboat floating behind them (forced perspective) in the treacherous sea.
  • First, esigned/created a miniature version of the steamboat in the “Steamboat Willie” set.
  • Then, decided on a simple 'black and white (with shades of gray)' habitat with the steamboat on rough water in the background, and Mickey and Minnie stranded in the foreground on two rocks.
Remarks
My MOC

Stone Castle Bridge

My Review
B+ 🟢 Nice implementation of castle-styled bridge
Designer
sbondi
Release Year
2020
Display
Supported on 48”x6” board (with brackets) across window for train passing
Design
  • As noted with the Metal Girder Bridge, conceived of both bridges together to cover the expanses across the window and door.
  • Since the 3D-printed brackets would not work across the window, installed a shelf to cover the expanse and support a stone castle bridge, a spiritual cousin of the Helm's Deep scene nearby.
  • Because of the blinds, could only put battlements on the inside, and on the other side, came up with an L-shaped design to fit into the blinds snugly.
  • Looked at online images of real castles and LEGO castles to eventually inspire my own custom design.
Remarks
My MOC

Subway Train

My Review
A 🟢 Significant more-source-accurate improvement over original design, including completely re-designed interior
Designer
sbondi
Release Year
2020
Display
On train tracks (stored on floating shelf in Train Yard)
Sets
  • Spider-Man's Train Rescue [just subway car]
Figures
  • Engine Car
    • Inside
      • Conductor [from Spider-Man set]
  • Passenger Car 1
    • Inside
      • Ross
      • Rachel
      • Gunther
  • Passenger Car 1
    • Inside
      • Chandler
      • Monica
      • Joey
  • Passenger Car 3
    • Inside
      • Phoebe
      • Joyce
      • Justin
Design
  • Engine Car
    • Created based on core design of 'Spider-man’s Train Rescue' subway car
      • Made fit 6x24 train base plate (extended by 8 studs)
        • Supported double doors and more spaced out single windows as they are in reality
      • Re-designed roof to be more rounded and smooth
      • Made support Powered Up motors/battery
        • Including adding roof section with push-through power button
        • Used two train motors (i.e., two sets of motorized wheels) for speed
          • Added LEGO “weight' part in front to give traction to front set of motorized wheels
          • In order to keep the front set of motorized wheels in the same direction, cut a hole in train base plate to allow motor cable front access
  • Passenger Cars (3)
    • Same design as Engine Car, but with:
      • Non-motorized wheels - although more modern decorated wheels with rotating bogie than what was in set
      • No Powered Up Hub inside
      • No power button on top
      • Underbelly section
      • Interior benches and passenger support poles
  • Added third-party lights (Light My Bricks) that are powered and controlled by the front motor channel of the Powered Up Hub
    • Cool White 30cm Bit Lights: Headlights for front car
    • White 15cm Bit Light: Conductor cabin light
    • Warm White Strip Lights (2x): For each passenger cabin’s lights
    • Red 30cm Bit Lights: rear car warning lights
    • Various Connector Cables and Expansion Boards
Remarks
My MOC

Teenage Mutant Ninja Turtles

My Review
A 🟢 Impressively organic-looking and source-accurate model, especially from a distance
Designer
buildbetterbricks
Product ID
MOC_TMNT_BBB
Release Year
2019
Pieces
1,400 (350 x 4)
Instructions
buildbetterbricks.com
Display
On top of shelving unit
Mods
  • Created base that secures them in position
Remarks
Fan MOC

Teenage Mutant Ninja Turtles Train Car

My Review
B+ 🟢 Cool-looking version of van as train car
Designer
sbondi
Release Year
2020
Display
On train tracks connected to Theme Train (stored on floating shelf in Train Yard)
Sets
  • Turtle Van Takedown [just van]
Figures
  • On Top
    • Raphael
    • Michelangelo
    • Leonardo
    • Donatello
    • Splinter
    • Shredder
  • Inside
    • April O’Neil [driver]
Design
  • Created train car based on design of Turtle Van
    • Re-designed 8x16 original van design with 4 large tires into 8x24 train car design sitting on top 6x24 standard train base plate with two rotating bogies each holding 4 train wheels
    • Removed tires and replaced tire connector bricks with clean wall
    • Expanded middle section by 8 studs
    • Purchased 2 extra stickered doors to support new double-door design on each side
    • Added matching train underbelly to look heftier
    • Being hefty with its 8-stud width, had to remove antenna and roof side tiles that extended beyond the 8-stud width and did not clear the 4 and 1/8 clearance of the Disney Train Station
Remarks
My MOC

Terminator

Display
On top of shelving unit
Sets/Figures
  • Terminator T-800 Bust (Fan MOC)
  • Terminator T-800 (Fan MOC)

Terminator T-800 Bust (Fan MOC)

My Review
A+ 🟢 Impressively detailed source-accurate model
Designer
thire5
Product ID
MOC-20570
Release Year
2018
Pieces
3,082
Instructions
Brick Vault
Mods
  • Substituted Tan color teeth in place of Light Bluish Gray color.
  • Added single plate layer to each of four back panel connections on trunk, since for some reason, was pulling arm core towards back.
  • Added three 2x2 inverted tiles to bottom of chest plate, since did not want to see back of plate from below.
  • Modified large “neck bones” by adding pole to better support inside (so as not to come apart with any type of stress) and by using stiff Light Bluish gray hose to replace smaller pole (so as not to come out the support holes when pushed to their limit).
  • Added more ventilation on back wall behind motor.
  • All this was originally in anticipation for implementing a vision I had of an automation-triggered animation to fun-scare guests - it would trigger his red eyes to turn on, and then his head to rotate to the left and then the right a couple of times. In the end, I did not manage to get it to rotate back, so I scrapped the design.
Remarks
Part of Terminator scene; purchased a mix of new and used parts to keep the price down, and only found 1 of the 15 orders to have some disappointing used parts

Terminator T-800 (Fan MOC)

My Review
B+ 🟢 Fairly source-accurate model using so few pieces
Designer
buildbetterbricks
Product ID
MOC_T-800
Release Year
2019
Pieces
534
Instructions
buildbetterbricks.com
Mods
  • Created mound of apocalyptic garbage (with back half of car on top) for far-away background
Remarks
Part of Terminator scene

The Flintstones Habitat

My Review
A 🟢 Compact nice-looking way to display iconic characters
Designer
sbondi
Release Year
2022
Display
On floating shelf
Sets
  • The Flintstones (21316-1) (basis of house facade excluding roof and car)
Figures
  • In car
    • Fred Flintstone
    • Barney Rubble
  • In front of house
    • Wilma Flintstone
    • Betty Rubble
Design
  • While the house front, car, and characters are clearly based on the official set, still had to conceive of the appropriate mini-scene to display in such a small space.
  • Was able to use most of the front house design below the roof from the official set.
  • Used a dark orange background behind the facade windows to match the cartoon.
  • Modified the car design from the set, since the bulky LEGO Technic design and wood rims did not match the cartoon well.
  • Added a road, the sun, and a cloud to complete the look.
Remarks
My MOC

The Iron Giant

My Review
A+ 🟢 Beautiful source-accurate model
Designer
buildbetterbricks
Product ID
MOC-14898
Release Year
2018
Pieces
818
Instructions
Rebrickable.com
Display
On floating shelf
Mods
  • Created green forest base platform with tall trees in the background
Remarks
Fan MOC

The Lord of the Rings and The Hobbit

Display
On top of 2 large cube columns
Sets
  • Helm's Deep
    • The Battle of Helm's Deep
    • Uruk-hai Army [extension set for the “The Battle of Helm's Deep” set]
    • Attack on Weathertop
  • Rivendell
Figures
  • Helm's Deep
    • All figures from sets
    • All Hobbit figures (even though sets are for The Lord of the Rings), including “Big Figs”:
      • Smaug
      • Goblin King
      • Warg
    • Cave Troll [The Lord of the Rings]
  • Rivendell
    • All figures from set
Mods
  • Helm's Deep
    • Put Green Baseplates for the floor
    • Created 3 faraway mountains in the background (with V-shaped green slope to further indicate grass plane in the distance), two on far left and the other on the right side
    • Modified “The Battle of Helm's Deep” castle entrance to curve in order to fit within space
    • Used 'Uruk-hai Army' for fortress wall extension and ballista
    • Used 'Attack on Weathertop” as ruins inside fortress walls
    • Created fortress wall extension from scratch to extend 'Uruk-hai Army” wall
    • Created small stone structure to angle dwarf up facing downward-facing Smaug
  • Rivendell
    • Put Bright Green Baseplates for the floor
    • Created 2 faraway mountains in the background (with V-shaped green slope to further indicate grass plane in the distance), one covering doorknob plate and the other behind Rivendell

The Muppets Show Theater

My Review
A+ 🟢 Colorful, fairly accurate theater scene to display iconic characters
Designer
mstrutt
Re-MOC Designer
sbondi
Release Year
2022
Display
On wire shelf (on top of large cube column)
Figures
  • Stage
    • Front section
      • Miss Piggy
      • Kermit the Frog (holding his banjo)
      • Fozzie Bear (holding a banana, and with a mic/stand in front of him)
    • Back section
      • The Swedish Chef (holding his egg beater, and with his scared tomato next to him)
      • Dr. Bunson Honeydew (holding his chemical flask)
      • Beaker (holding his meter)
      • Gonzo (with his chicken next to him)
  • Orchestra section
    • Janice (holding her guitar)
    • Animal (holding his drumsticks, and with his drum set next to him)
    • Rowlf the Dog (with his musical keyboard next to him, and his classic composer bust and music sheet on it)
  • Balcony section
    • Statlet (holding his laptop with Scooter on the screen)
    • Waldorf (holding his cup of tea)
History
  • When I received the 12 super cool Muppets minifigs, I just placed them on a big LEGO plate, not knowing how to display them.
  • Then my friend suggested that the recently released Friends 'Andreas Theater School' set could be a perfect way to display the minifigs.
  • I checked it out, and saw that it had potential for this purpose, but it was way bigger than what I had space for, and did not particularly look like The Muppets Show Theater.
  • So, still liking the idea, I went to Rebrickable.com to see what if any MOCs had been made of The Muppets Show Theater. While there was one that caught my attention from mstrutt, it was also significantly bigger than the compact minifig display vehicle that I was hoping for.
  • While the Fan MOC did inspire the basis for my design, because I was not fully satisfied with it, I looked at all the pictures I could find of the theater from the show to determine the key aspects that I wanted to model.
Design
  • Used Bricklink Studio to design the model from scratch (with both the Fan MOC and show references in mind) as compact a stage and balcony section as possible.
  • Improved the stage design, the curtains design, the band area design, the piano design, and the balcony design.
  • While initially created the Balcony section as a different build, it took up an unnecessary amount of shelf space. So removed the bottom floor and hinged it to the theater, so they pair seamlessly together, and this can even hang off of a shelf. Also seriously shortened the balcony top which was obstructing the view of the characters.
Remarks
My Re-MOC of Fan MOC

The Simpsons

Display
On top of 1 large cube column
Sets
  • The Simpsons House
  • The Kwik-E-Mart
Figures
  • The Simpsons House
    • Outside on lawn
      • Marge [holding broom and wheelbarrow with plant]
      • Bart [on skateboard headed up ramp]
      • Lisa [watching Marge]
      • Maggie [holding teddybear near Marge]
      • Santa's Little Helper [sniffing plant on wheelbarrow]
      • Snowball [walking away from Marge]
      • Milhouse [watching Bart]
      • Nelson [watching Bart, holding club]
    • Outside grilling in backyard
      • Flanders [grilling sausage, holding spatula]
      • Homer [watching grill]
      • Grandpa [behind Homer]
    • Outside on street in police car
      • Chief Wiggum [holding club]
      • Snake [with handcuffs in back]
  • The Kwik-E-Mart
    • Inside the store
      • Apu [behind register, holding broom]
      • Homer [at register]
      • Marge [in aisle, holding basket]
      • Bart [playing arcade game]
    • Outside in parking lot, front row to back, left to right
      • Facing crowd
        • Smithers [holding boxed Malibu Stacy]
        • Mr. Burns [at speaking podium]
        • Chief Wiggum [holding megaphone]
      • First Row
        • Dr. Hibbert [holding Homer head X-ray]
        • Ralph [holding Valentine’s card]
        • Krusty the Clown [holding pie]
      • Second Row
        • Groundskeeper Willie [holding plunger]
        • Scratchy [holding ax]
        • Itchy [holding club]
        • Martin
      • Third Row
        • Edna Krabappel [holding coffee cup]
        • Professor Frink [holding beaker]
        • Comic Book Guy [holding comic book and Squishee]
        • Hans Moleman [holding voided license]
        • Milhouse [dressed as Fallout Boy, holding Buzz Cola]
        • Bart [dressed as Bartman, holding slingshot]
      • Back Row (on storefront)
        • Patty [holding pocketbook]
        • Selma [holding eye test]
        • Apu [holding Squishee]

The Wizard of Oz Habitat

My Review
A+ 🟢 Lots of good-looking detail in a small space, and cool flying effect
Designer
sbondi
Release Year
2022
Display
On floating shelf
Figures
  • On the yellow brick road
    • Dorothy
    • Toto
    • Tin Man [holding his ax and a 'heart' clock]
    • Scarecrow [no space to hold his certificate]
    • Cowardly Lion [holding his medal]
  • In the night sky
    • Wicked Witch [holding broom]
    • Flying Monkey
Design
  • Conceived of 3 aspects of the movie that I wanted to represent in one scene: the heroes walking down the Yellow Brick Road, The Wicked Witch of the East crushed under Dorothy’s house, and the The Wicked Witch of the West with her flying monkey flying through the night sky.
  • Made the heroes, Dorothy, Toto, The Scarecrow, The Tin Man, and the Cowardly Lion, walk down The Yellow Brick Road.
  • Built a corn field around the road.
  • Built the house crushing The Wicked Witch of the East (I used LEGO mini-doll legs to be more appropriate).
  • Placed The Wicked Witch and her Flying Monkey in the air - flying in the night sky.
  • Added a moon to complete the look.
Remarks
My MOC

Train Tracks

Display
Across all room walls
Parts
  • (for tracks and yard)
  • Bluetooth remote control
  • Tracks
    • Disney set (4 straight, 16 curved)
    • 5 sets of 20 (8 straight, 8 flexible, 4 curved)
    • 46 straight tracks
    • Total tracks
      • Straight: 90
      • Flexible: 13
      • Curved: 24
  • Wall mounts
    • ~54 standard mounts (1 per 10 non-curve inches)
      • 3 with 4-inch spacers to cover indentation above doorway
    • 2 curve mounts (each covering 28 inches)
    • 1 12”x10” floating shelf on wall behind door to support curve, since curve mounts were not usable there
    • 1 24”x8” glass shelf (with brackets) on angled wall near front door, since curve mounts were not usable on the two consecutive 45 degree angles
  • Train Yard shelves
    • 6 24”x8” floating shelves on wall left of closet door
History
  • After building many LEGO scenes, I became enamored with the LEGO Disney Train when it came out.
  • At the same time, I just got the Disney+ streaming service, and saw its entry screen with all the cool brands they had / had acquired:
    • Classic Disney
    • Modern Disney
    • Pixar
    • Marvel
    • Star Wars
    • Fox
  • I thought it would be cool to create a train scene focused on the Disney Train with custom cars for each of Disney’s sub-brands.
  • And I thought it would be even cooler if it could traverse the walls of my oddly shaped (because the walk-in closet has one angled closet wall and is carved out of the square 12x12 room) Robot Room which also houses my drones and LEGO.
  • I then thought it would be even cooler to create other alternate trains that could sit in a virtual train yard (shelves on a wall) until they are switched out onto the track once in a while:
    • A high-speed train
    • A Subway train
    • A Harry Potter train
    • A multi-theme train pulled by a LEGO Cargo Engine Car with themed custom train cars (some totally custom -and- others with major mods): Star Wars, Jurassic World, etc.
Remarks
  • Warning: Any train at the max 8-stud width should be sure that anything extending outside the 8-stud width on the wall-facing side must stay below the 4.12-inch clearance of the Disney Train Station front lamps

Transformers - Optimus Prime

Display
On floating shelf
Sets/Figures
  • Optimus Prime
    • x2 for truck form
Mods
  • Optimus Prime
    • Created down-sloped platform for truck form

Trolls Club Car

My Review
A 🟢 Nice implementation of bus in train car form
Designer
sbondi
Release Year
2020
Display
On train tracks connected to Theme Train (stored on floating shelf in Train Yard)
Sets
  • Rainbow Caterbus [just bus]
Figures
  • Inside
    • Front Area
      • Poppy [driver]
      • Branch (With Backpack) [standing behind driver]
    • Top Level (on forward leaning stands)
      • Mermaid
      • Biggie [with Mr. Dinkles]
    • Bottom Level
      • Cooper
      • Barb
      • Cloud Guy [behind column]
      • Guy Diamond
      • Tiny Diamond [on stand]
    • Rear Area
      • Hickory
Design
  • Created train car based on design of Caterbus
    • Re-designed 8x16 original design to fit on 8x34 (expanded with plates from standard 6x34) club car train base plate with two rotating bogies each holding 4 train wheels
    • Did not implement tires and tire assembly on bottom, but simulated larger “lime ball feet' by placing eight 3x3 lime dishes only on the display side (due to extending beyond planned width):
      • 2x two 2-wide brackets (plus 1x2 trans-black tile and 2x2 plate) under the 6-to-8-stud plate extender that is in front of each train bogie/wheel assembly
      • 2x two 1-wide brackets (plus 1x2 jumper plate) under the 6-to-8-stud plate extender that is in front of each of the two sections in the middle area
    • Redesigned front “face” design to sit on dish (not flat like original design)
      • Implemented more accurately sized mouth (hiding bottom lip to maintain overbite look while not being excessively big)
      • Moved antennae directly above dish versus in the roof holes, leaving a space above them due to increased height
    • Maintained driver controls (although did not integrate into front wall)
    • Implemented ears overlapping window “frame'
    • Implemented similar contrasted window “frames”, but smooth surface (not studded), oval (not round), taller, and wider
    • Implemented very open top design to let in light
    • Did not implement benches inside
    • Maintained cargo holds on rear top
    • Maintained rear “butt” design, but with taller back
    • Extended buffers by 2 more studs due to protruding face and butt
  • Swapped out large trans-orange fire piece in Barb’s hair for shorter one
Remarks
My MOC

Voltron

Display
On top of shelving unit
Sets/Figures
  • Voltron
Mods
  • Purchased 2 sets to display 4 lions (on stands) around Voltron
  • Created high down-sloped stands for lions

WALL-E

Display
On top of shelving unit
Sets/Figures
  • WALL-E
Mods
  • Motorized with:
    • Power Functions M-Motor (8883) (2x)
    • Power Functions IR Remote (8885)
    • Power Functions IR Receiver (8884)
    • Power Functions Rechargeable Battery (8878)
    • Power Functions Transformer (45517)

Winnie the Pooh Habitat

My Review
A 🟢 Compact nice-looking way to display iconic characters
Designer
sbondi
Release Year
2022
Display
On floating shelf
Sets
  • Winnie the Pooh (21326-1) (basis of tree bottom design, large log, and campfire)
Figures
  • In front of bee hives
    • Winnie the Pooh [holding stick, honey jar in front]
  • Around campfire
    • Eeyore [wearing bow]
    • Piglet [holding an umbrella]
    • Tigger [holding his runaway bag on a stick]
  • In rabbit hole
    • Rabbit [holding a carrot]
Design
  • While the concept of ‘Mr. Sanders’ Tree (a whole tree in the official set) and the forest artifacts are based on the official set, conceived of the specific scene and the hole for Rabbit.
  • Redesigned the tree bottom from the official set, since it did not look a whole lot like the movie version which has the tree wrapping two of its large roots around the grassy hill it was on top of, and the house being fully integrated under that hill/tree.
    • Made a better wooden door.
    • Made the large tree roots better protrude on the left side of the door and right side of the hill.
    • Used the 'Mr Sanders' sign from the official set.
    • Added tree limbs coming forward to hang two bee hives (one for Winnie to hit with a stick).
  • Used the exact designs of the large log, campfire (with Eor, Piglet, and Tigger around it), and mushrooms from the official set.
  • Added a rabbit hole for Rabbit to pop out of.
  • Added extra ladybugs and honey jars to complete the look.
Remarks
My MOC